2. How to accomplish…
2.1. Basic configuration of the system
After installing SCURTY a number of decisions have to be made before the system is usable:
Which tablespaces should be available to users?
Which profiles should be available?
Which icustom database roles should be available for granting?
Who should be informed of incidents via email?
Apart from the last task these steps have to be executed by a DBA. Although SCURTY enables segregation of duties and hands over the privilege handling to SCURTY admins it still belongs to the DBA to decide wich tablespaces, profiles and maybe also custom roles shoukld be available within the SCURTY user management.
2.1.1. Which tablespaces should be available for SCURTY managed users?
The following steps describe how to make tablespaces available to users. The last step describes how to make a tablespace unavailable.
2.1.1.1. Query existing tablespaces in the database
First, you need to know which tablespaces exist in the database. Run this query as a suitably privileged user to produce an overview of the available tablespaces:
1SELECT tablespace_name,
2       contents,
3       round(max_size/1024/1024/1024) "MaxSize GB"
4  FROM dba_tablespaces;
2.1.1.2. Query tablespaces already provisioned for usage with SCURTY
Check the tablespaces which are already assigned for use by SCURTY managed users.
1SELECT * FROM adm_user_tablespaces;
2.1.1.3. Add a tablespace for usage with SCURTY
If you have identified a tablespace that you would like to add, you can do so by using procedure p_rep_admin.associate_user_ts. You may optionally add a comment and mark it as the default tablespace (TRUE or FALSE) for all new SCURTY managed users. You may also use this procedure to change the attributes of an already provisioned tablespace.
Example: make the tablespace USERS available to SCURTY users and make it the default tablespace
1EXEC p_rep_admin.associate_user_ts('USERS','Tablespace for SCURTY-users', TRUE);
Check ADM_USER_TABLESPACES:
1SELECT tablespace_name, dba_comment, is_default
2  FROM adm_user_tablespaces;
3
4TABLESPACE_NAME DBA_COMMENT                          IS_DEFAULT
5--------------- ------------------------------------ ----------
6USERS           Tablespace for SCURTY-users          Y
Additional information about associated tablespaces can be found in ADM_USER_TABLESPACE_DETAILS, ADM_USER_TABLESPACE_QUOTAS and ADM_USER_TABLESPACE_USAGE.
2.1.1.4. Disable a tablespace from being used with SCURTY
To disable a tablespace from being used with SCURTY first identify the tablespace to be removed using the query above. Then execute procedure p_rep_admin.disassociate_user_ts to disassociate the tablespace.
Example: disassociate tablespace USERS
1EXEC p_rep_admin.disassociate_user_ts('USERS');
2.1.2. Which profiles should be available?
You may add one or more profiles that will be available to be assigned to SCURTY managed users.
2.1.2.1. Find existing profiles in the database
Firstly, find out which profiles exist in the database. Execute this query as a suitably privileged user to produce an overview of the existing profiles:
1SELECT DISTINCT profile FROM dba_profiles;
2.1.2.2. Query profiles already provisioned for usage with SCURTY
You now need to find out which of the profiles are already assigned for use with SCURTY managed users.
1SELECT profile_name, dba_comment
2  FROM adm_user_profiles;
2.1.2.3. Add a profile for usage with SCURTY
If you have identified a profile that you would like to make available to SCURTY managed users do so by using procedure p_rep_admin.associate_user_profile:
Example: associate HU_PROFILE for use with SCURTY managed users
1EXEC p_rep_admin.associate_user_profile( 'HU_PROFILE', 'To be used with SCURTY users');
The definitions are stored in table ADM_USER_PROFILES:
1SELECT profile_name, dba_comment
2  FROM adm_user_profiles;
3
4PROFILE_NAME         DBA_COMMENT
5-------------------- ---------------------------------
6HU_PROFILE           To be used with SCURTY users
Additional information about custom profiles can be found in ADM_USER_PROFILE_DETAILS.
Furthermore, you may set this profile as a default for new HUs and/or GUs by setting the parameters adn_hu_profile and adm_gu_profile in ADM_PARAMS.
2.1.2.4. Disable a profile from being used with SCURTY
If you want to remove a profile from the available profiles to SCURTY managed users execute procedure p_rep_admin.disassociate_user_profile:
Example: disassociate profile HU_PROFILE
1EXEC p_rep_admin.disassociate_user_profile('HU_PROFILE');
2.1.3. Which custom database roles should be available for GUs and HUs?
SCURTY creates and grants all the roles necessary to manage access rights automatically in the background. If you would like to grant additional database roles to SCURTY users, the DBA has to enable these roles within SCURTY to make them available for granting. The following steps describe how to do this and how to grant a role. Only roles that are not maintained by Oracle can be granted to SCURTY users. We also show how to remove a role from the available roles and how to revoke a role from a user.
Important
Use such custom roles only if you need to grant additional system privileges to HUs or GUs or if you need to grant special object privileges which cannot be managed by SCURTY dynamically.
2.1.3.1. Query existing database roles in the database
Firstly you need to know which roles exist in the database. Perform this query as a suitably privileged user to produce an overview of the existing database roles:
1  SELECT role
2    FROM dba_roles
3   WHERE oracle_maintained = 'N'
4ORDER BY role;
2.1.3.2. Which database roles are already available for granting to SCURTY managed users?
You now need to take a look at which of the roles are already assigned for granting to SCURTY managed users. To get this information, perform the following query:
1SELECT * FROM adm_user_custom_roles;
Additional information about custom roles can be found in ADM_USER_CUSTOM_ROLE_DETAILS.
2.1.3.3. Make a database role available for granting to SCURTY managed users
If you have identified a database role that you would like to add to the available roles for granting, do so by using procedure p_rep_admin.associate_user_custom_role.
Example: associate the role APP_USER_SCURTY for user as a custom role with SCURTY managed users
1EXEC p_rep_admin.associate_user_custom_role( 'APP_USER_SCURTY', 'For business app users');
The new role is visible in table adm_user_custom_roles:
1SELECT * FROM adm_user_custom_roles;
2
3ROLE_NAME       DBA_COMMENT
4--------------- --------------------------------
5APP_USER_SCURTY For business app users
In addition you may specify such a custom role as a default for each new SCURTY user (HU or GU) by changing the parameters adm_gu_def_role and adm_gu_def_role, respectively.
2.1.3.4. Remove a custom database role from usage with SCURTY
If you want to remove a role from the available roles for granting to SCURTY users execute procedure p_rep_admin.disassociate_user_custom_role:
Example: disassociate the role APP_USER_SCURTY
1EXEC p_rep_admin.disassociate_user_custom_role('APP_USER_SCURTY');
2.1.3.5. Grant a role to a user
If you have made a custom database role available you may grant it to a user of type GU or HU. Use procedure p_rep_oper.grant_custom_role to grant the role. Users of type TU cannot be granted any additional custom roles.
Example: grant the custom role MY_TEST_ROLE to user WKLINGER
1EXEC p_rep_oper.grant_custom_role( 'WKLINGER', 'MY_TEST_ROLE');
2.1.3.6. Revoke a custom role from a user
To revoke a custom database role from a user use procedure p_rep_oper.revoke_custom_role.
Example: revoke the custom role MY_TEST_ROLE from user WKLINGER
1EXEC p_rep_oper.revoke_custom_role( 'WKLINGER', 'MY_TEST_ROLE');
2.1.4. Who should be informed of incidents via email?
You may provide an email address for receiving monitoring alerts and another for receiving sandbox workflow information. These parameters, amongst others, are stored in table ADM_PARAMS.
2.1.4.1. Query existing parameters in table ADM_PARAMS
Query ADM_PARAMS_INFO for a more meaningful interpretation of ADM_PARAMS:
 1SELECT * FROM ADM_PARAMS_INFO
 2 WHERE name like '%mail%';
 3
 4NAME                           DESCRIPTION                                                            VALUE_TYPE VALUE                          DEF_VALUE  IS_DEFAULT
 5------------------------------ ---------------------------------------------------------------------- ---------- ------------------------------ ---------- ----------
 6mail_auth_user                 username for SMTP server authentication                                TEXT       someuser                                  N
 7mail_auth_password             password for SMTP server authentication                                TEXT       <password>                                N
 8mail_auth_encryption           encryption method for SMTP server authentication: PLAIN or STARTTLS    TEXT       STARTTLS                       PLAIN      N
 9sbx_spoc_mail                  mailing list of SPOC for sandboxes, addresses separated by comma       TEXT       scurty_spoc@sphinx.at                     N
10mon_mail                       mail address for monitoring alerts                                     TEXT       scurty_spoc@sphinx.at                     N
11mail_server                    SMTP server                                                            TEXT       mailout.sphinx.at                         N
12mail_noreply                   dummy mail sender address                                              TEXT       noreply@sphinx.at                         N
13mail_port                      SMTP port                                                              NUMERIC    587                            25         N
2.1.4.2. Change a parameter
Use procedure p_rep_admin.set_param to set a parameter.
Example: set parameters mon_mail and sbx_spoc_mail to wklinger@sphinx.at
1EXEC p_rep_admin.set_param ( 'mon_mail', ' wklinger@sphinx.at');
2EXEC p_rep_admin.set_param ( 'sbx_spoc_mail', 'wklinger@sphinx.at');
2.2. Prepare administrative users
There are 5 different administrative roles which are relevant for using the SCURTY API: a) Admin b) Designer c) Operator d) Monitoring User e) Sandbox Admin
Each role corresponds to a specific SCURTY database role. For the exact names of the roles see the second query below. You need at least one ADMIN user in order to manage SCURTY. This ADMIN user may then assign other administrative roles to other users. However, the first ADMIN account must be assigned by the DBA.
Example: list the accounts SCURTY administrative privileges
 1SELECT username
 2      ,admin_type
 3      ,is_dba
 4      ,is_admin
 5      ,is_oper
 6      ,is_sbx_admin
 7      ,is_mon_user
 8      ,is_designer
 9  FROM rep_all_users
10 WHERE admin_type > 0;
11
12USERNAME   ADMIN_TYPE IS_DBA IS_ADMIN IS_OPER IS_SBX_ADMIN IS_MON_USER IS_DESIGNER
13---------- ---------- ------ -------- ------- ------------ ----------- -----------
14SYS                63 Y      N        N       N            N           N
15SYSTEM             63 Y      N        N       N            N           N
16TPETRIK            23 N      Y        Y       Y            N           Y
17SCURTY             63 N      N        N       N            N           N
18TP                  2 N      N        Y       N            N           N
The column ADMIN_TYPE is a bitmask which is greater 0 if the user has some administrative privilege. Note that the SCURTY user itself of course has all privileges like a DBA although he is not assigned a dedicated role.
The names of the corresponding database roles are defined at installation time (see Installation Guide.
2.2.1. Add an administrative user
You may grant a SCURTY admin role to any unclassified database user or to SCURTY managed HU or GU.
2.2.2. Create a SCURTY managed user
Example: create a human user (HU) named SCADM with password ‘change’
1EXEC p_rep_oper.create_user ('SCADM', 'change', 'HU');
2.2.2.1. Grant administrative privileges to a user
A user holding DBA or SCURTY administrator privileges may grant one or more administrative privileges to users by executing procedure p_rep_admin.grant_admin_role.
The possible values for the admin type are:
ADM for the SCURTY admin
SBX for the SCURTY sandbox admin
OPR for the SCURTY operator
DES for the SCURTY designer
MON for the SCURTY monitoring user
Note
By grating the admin role all other rolese (except the monitoring role) are granted as well implicitly.
Example: grant the admin role to user SCADM:
1EXEC p_rep_admin.grant_admin_role ( 'SCADM', 'ADM');
Check REP_ALL_USERS for the relevant flags.
2.2.3. Revoke administrative roles from a user
A user holding DBA or SCURTY administrator privileges may revoke an admin role from a user by executing procedure p_rep_admin.revoke_admin_role.
Example: revoke the operator role from user WKLINGER
1EXEC p_rep_admin.revoke_admin_role ('WKLINGER', 'OPR');
2.3. Prepare business users
To provide users with access to data protected by SCURTY you need to create those users and grant privileges to them. You may also reuse existing database users, except the Oracle maintained ones, such as SYS, SYSTEM etc. If you have to create a new user do this using procedure p_rep_oper.create_user.
Note
You can create an administrative user in the same way as a business user. The roles granted after creating the users defines the difference between them.
The diagram below illustrates the preparation of users:
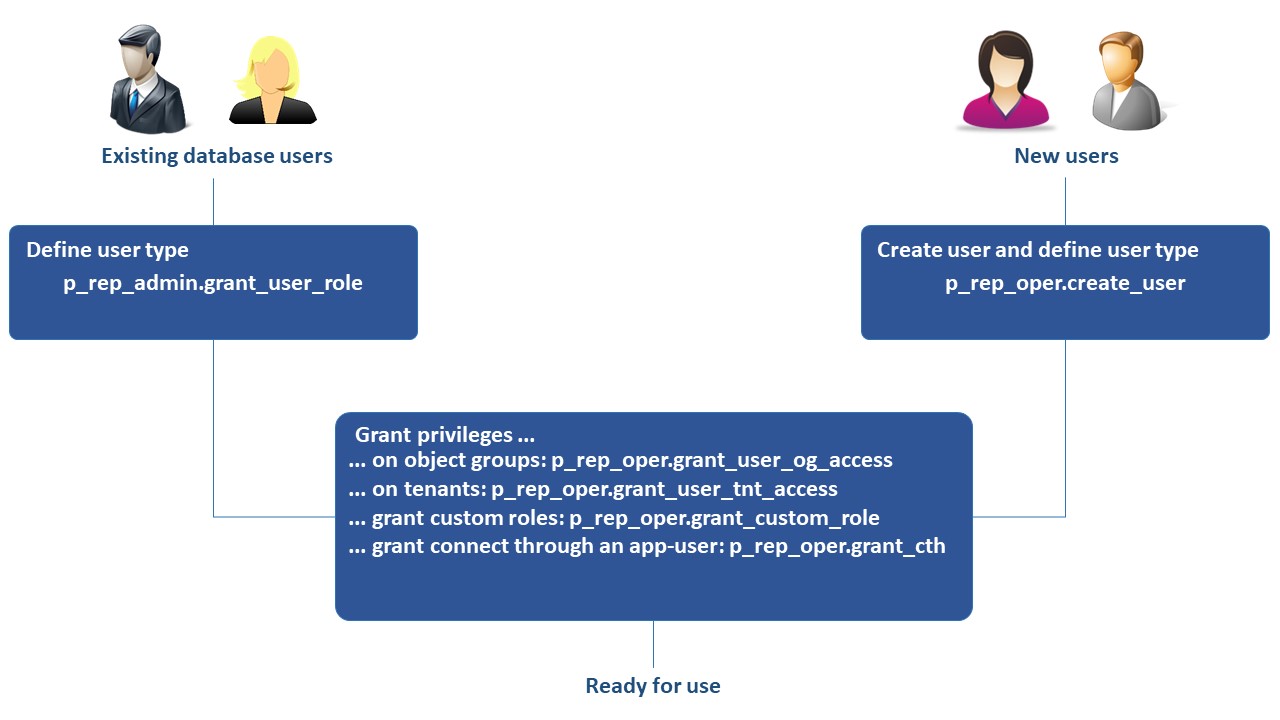
Fig. 2.1 User provisioning
2.3.1. Add a business user
2.3.1.1. Check existing users
Query table rep_all_users to produce a list of all existing users and to see whether they are maintained by Oracle as well as their SCURTY user types:
Example
 1SELECT
 2  username,
 3  oracle_maintained,
 4  is_hu,
 5  is_gu,
 6  is_tu
 7FROM rep_all_users
 8ORDER BY username;
 9
10USERNAME               ORACLE_MAINTAINED IS_HU IS_GU IS_TU
11---------------------- ----------------- ----- ----- -----
12SCADM                  N                 Y     N     N
13SCURTY                 N                 N     N     N
14SYS                    Y                 N     N     N
15SYSKM                  Y                 N     N     N
16SYSRAC                 Y                 N     N     N
17SYSTEM                 Y                 N     N     N
18TPETRIK                N                 Y     N     N
19WKLINGER               N                 Y     N     N
20...
Note
A user can only be assigned one of the roles HU, GU or TU.
2.3.1.2. Make an existing or a new database user a SCURTY business user
To make a database user a SCURTY user you have to define the user type (HU, GU or TU) of the user. If a physical user should be able to log in and use objects protected by SCURTY, this user should be assigned the user type HU.
Depending upon the existence of a database user you have to follow either step (a) or step (b):
a) Define the user type for an existing database user If the prospective SCURTY business user already exists in the database you have to provide the user with the user type human (HU). Oracle maintained users may not be used together with SCURTY. A user holding DBA or SCURTY administrator privileges may define user types by using procedure p_rep_admin.grant_user_role.
Example: make an existing database user a SCURTY managed human user (HU)
1EXEC p_rep_admin.grant_user_role ('WILLIAMS', 'HU');
b) Create a user if there is no database user and define the user type If the new SCURTY business user does not already exist in the database you have to create the user and provide the user type human (HU) to the user. A user holding DBA or SCURTY operator privileges may create other users by using procedure p_rep_oper.create_user.
Example: create user SMITH of type HU with password ‘change’
1EXEC p_rep_oper.create_user ('SMITH', 'change', 'HU');
2.3.1.3. Grant access privileges
You have to grant access privileges using the SCURTY API to provide access to data protected by SCURTY. There are several types of privileges that can be granted:
Access to object groups (roles and restrictions on column level)
Access to tenants (restrictions on row level)
Custom database roles
The connect through privilege to connect using an application user
Object group and tenant access are described in sections “Grant/revoke access on object groups” and “Grant/revoke access on tenants”. For examples of granting custom database roles (p_rep_oper.grant_custom_role) and the connect through privilege (p_rep_oper.grant_cth) see the SCURTY API Reference Guide.
2.3.2. Change an existing business user
If necessary you may change the attributes of an existing user. You may lock or expire an account, provide a new password or a new profile, change the default permanent tablespace or the quota on this tablespace. This can be performed using procedure p_rep_oper.alter_user.
Example
 1BEGIN
 2	p_rep_oper.alter_user (
 3		 'wklinger',     -- the username who's attributes should be changed
 4		 TRUE,           -- expire the account
 5		 'newpwd',       -- set a password
 6		 FALSE,          -- the account will not be locked
 7		 NULL,           -- the profile remains unchanged
 8		 NULL,           -- the tablespace remains unchanged
 9		 2               -- the quota is set to 2 GB
10	);
11END;
2.3.3. Remove a user
To remove an administrative or business user from the database use procedure p_rep_oper.drop_user:
Caution
All objects in the users private sandbox (i.e. in his schema) will be dropped as well.
Example: drop user SMITH
1EXEC p_rep_oper.drop_user('SMITH');
2.4. Create/remove object groups
Object groups are a collection of database objects (e.g. tables or views). Object groups can be used as the basis for providing fine grained access to the objects contained in the group. You may add object groups and objects to those groups in one of two ways:
Create a new object group by using procedure p_rep_designer.add_object_group. You may explicitly add objects to a group using procedure p_rep_designer.register_object and/or add objects via search patterns by using procedure p_rep_designer.add_obj_discover_rule.
Create a new object group and automatically add objects to this group by using procedure p_rep_admin.add_og_discover_rule. With this method search patterns are used to identify objects that are then added to a new automatically created and named object group.
There are some differences between the methods: Using method 1:
You may name the object group yourself.
You may explicitly add objects by name using procedure p_rep_designer.register_object.
You may explicitly remove objects that were previously added using procedure p_rep_designer.register_object.
Using method 2:
The object group is named automatically. The name starts with U$ followed by the schema name.
Objects may only be added/removed by changing the discover rules.
You may not register additional objects.
The following section uses the first method.
2.4.1. Create an object group
Check the table REP_OBJECT_GROUPS for existing object groups.
2.4.1.1. Create a new object group
A user holding DBA or SCURTY designer privileges may create object groups using procedure p_rep_designer.add_object_group.
Example:
Create a new object group named AppB, add description ‘Application B objects’ and mark the group to not contain shared objects (FALSE) as well as allowing read/write access (TRUE) and set views in the object group to read only (FALSE).
1EXEC p_rep_designer.add_object_group('AppB', 'Application B objects', FALSE, TRUE, FALSE);
2.4.1.2. Add objects to the object group
You may now add objects to the object group using procedure p_rep_designer.register_object and/or p_rep_designer.add_obj_discover_rule. Again, the user executing these procedures needs DBA or SCURTY designer privileges.
Example:
Add user SCOTT’s table EMP to object group AppB. The last parameter FALSE tells SCURTY not to keep the object definition in the group if the physical object is dropped from the database.
1EXEC p_rep_designer.register_object('SCOTT', 'EMP', 'AppB', FALSE);
Add all tables in schema WILLIAMS to object group AppB. The table and the comment include pattern parameters are set to all (.*). The exclusion pattern parameters are all set to NULL, which means no exclusion will occur. The include parameters are omitted which means the default applies: tables, views and materialized views will be included while executable programs (functions, procedures and packages) will be excluded.
1EXEC p_rep_designer.add_obj_discover_rule ('AppB', 'WILLIAMS', NULL, '.*', NULL, '.*', NULL, 'include all tables of WILLIAMS');
2.4.1.3. List objects contained in an object group
Check the view REP_OG_OBJECTS.
Example: List all objects included in object group AppB
 1SELECT
 2  object_owner,
 3  object_name,
 4  object_group,
 5  keep_on_drop,
 6  source,
 7  last_change
 8FROM rep_og_objects
 9WHERE object_group='AppB'
10ORDER BY object_owner, object_name;
11
12OBJECT_OWNER OBJECT_NAME OBJECT_GROUP KEEP SOURCE LAST_CHANGE
13------------ ----------- ------------ ---- ------ -----------
14SCOTT        EMP         AppB         N    DES    14-JAN-20
15WILLIAMS     CUSTOMER    AppB         N    INT    14-JAN-20
16WILLIVAMS    EMPLOYEE    AppB         N    INT    14-JAN-20
2.4.2. Remove an object group
To list all existing object groups see section “Check existing object groups”. To remove an object group including grants on the group use procedure p_rep_designer.remove_object_group.
Example: remove object group AppB
1EXEC p_rep_designer.remove_object_group('AppB');
2.5. Register/unregister sensitive columns
If you register a column as a sensitive column, data of this column may be hidden in all or in some rows, depending upon the access rights granted. Alternatively, sensitive columns may be configured to show redacted (masked) data. This chapter describes the use of sensitive columns without data redaction. A detailed description of how to use sensitive columns with data redaction is available in chapter Sensitive columns using data redaction (masking). If a user has been granted access rights to an object group through procedure p_rep_oper.grant_user_og_access with parameter p_scol_access set to FALSE the user will not see any of the sensitive columns in that object group. If sensitive columns should only be hidden in some rows, dependent upon other data in these rows, you have to define tenants and grant access to those tenants. Tenants consist of tenant columns that contain data which is used to decide on access rights. Access granted on tenants overrides the object group setting for sensitive column access, except when data redaction is used. Data redaction masks the query output if no sensitive column access was granted on an object group and the column is configured to use redaction. Object group privileges regarding sensitive columns override the tenant privileges in case of data redaction. Redacted columns show masked values for all rows of the query result set.
Redaction (masking) may be done in one of four ways: • Full redaction • Random values • Regular expression based redaction • Partial redaction
Example:
Without data redaction: user YELLOW may see rows with custid = 100, 105 and 107 but always without data from column repid. User BLUE may see data in table customer for rows with custid = 100, 101, 102 and 103 (the tenant column) but data from column repid (the sensitive column) is only visible for rows with custid = 100 or 103.
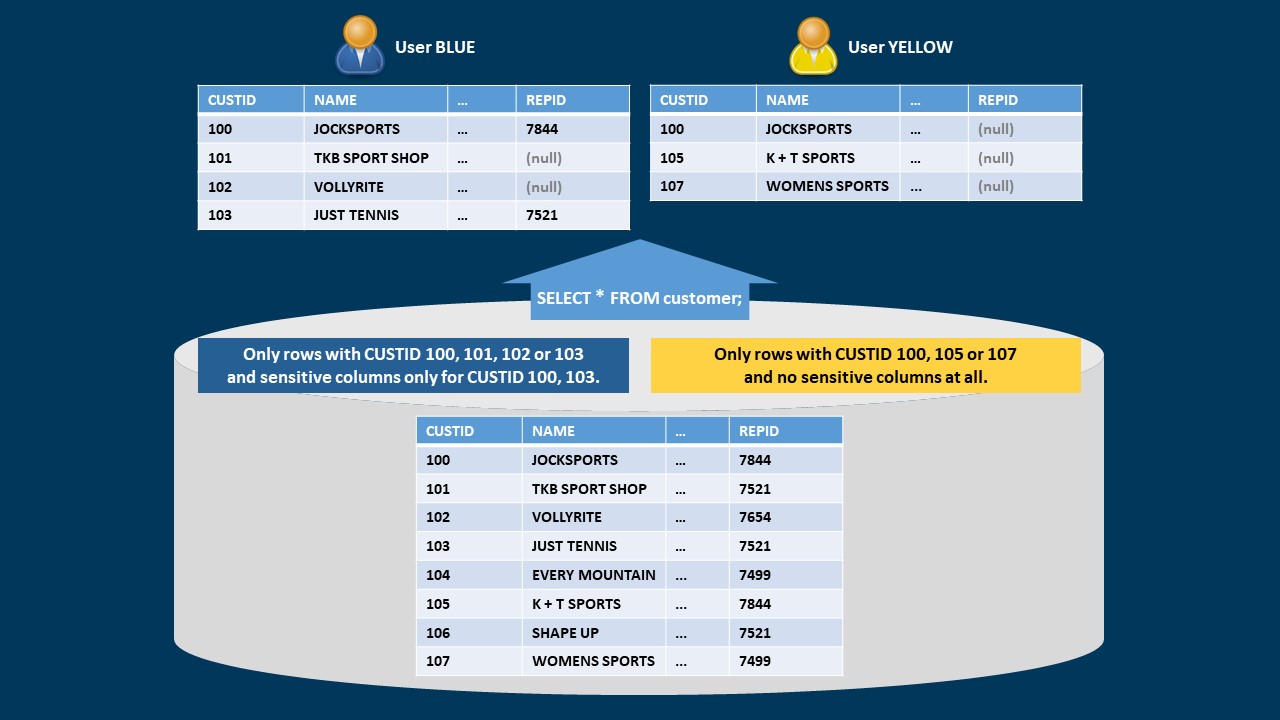
Fig. 2.2 Row and sensitive column visibility depending on a tenant column
Regardless of the above grants a user will see all columns and rows if the user has been granted the exempt fine grained access control privilege. This privilege is granted by procedure p_rep_oper.grant_exempt_fgac and may be revoked by procedure p_rep_oper.revoke_exempt_fgac.
2.5.1. Register columns as sensitive columns
There are two ways to register columns as sensitive columns:
Register sensitive columns using search patterns (regular expressions) that evaluate schemas, tables, column names and column comments. This is done by using procedure p_rep_designer.add_scol_discover_rule.
Register a column identified by its name using procedure {ref}p_rep_designer.register_scol<p_rep_designer.register_scol>`.
We will demonstrate both methods in the following sections.
2.5.1.1. Register columns using search patterns
You may create a rule that uses regular expressions to search for sensitive columns. This can be performed using procedure p_rep_designer.add_scol_discover_rule. A user holding DBA or SCURTY designer privileges may execute this procedure.
The procedure takes include and exclude patterns for schema names, table names, column names and column comments as arguments and you may add a comment to the rule.
2.5.1.2. Register a column by column name
To add a named column to the list of sensitive columns use procedure p_rep_designer.register_scol.
Example:
The following example registers column CREDITLIMIT in table CUSTOMER from schema WILLIAMS as a sensitive column. The parameter TRUE marks the definition to be kept even if the column is physically dropped. Data redaction is not used as parameter p_dr_mode is omitted.
1EXEC p_rep_designer.register_scol('WILLIAMS', 'CUSTOMER', 'CREDITLIMIT', TRUE);
2.5.1.3. List all registered sensitive columns
Check the table REP_SENSITIVE_COLUMNS to get a list of all registered sensitive columns.
Example
 1   SELECT
 2         table_owner,
 3         table_name,
 4         column_name,
 5		 source,
 6         keep_on_drop
 7    FROM rep_sensitive_columns
 8ORDER BY table_owner, table_name;
 9
10TABLE_OWNER     TABLE_NAME  COLUMN_NAME   SOURCE  KEEP_ON_DROP
11--------------- ----------- ------------- ------- -------------
12WILLIAMS        CUSTOMER    CREDITLIMIT   DES     Y
13WILLIAMS        CUSTOMER    REPID         DES     Y
14WILLIAMS        EMPLOYEE    COMM          INT     N
15WILLIAMS        EMPLOYEE    SAL           INT     N
Column source shows whether a column was added manually (source = DES) or via search patterns by a discover rule (source = INT).
2.5.2. Unregister sensitive columns
You have to use one of two ways to unregister a column from the list of sensitive columns depending upon how the column was registered as a sensitive column:
The column was registered using patterns (regular expressions) in a search rule.
In this case, you have to change the search patterns to exclude the columns or remove the whole rule to unregister the column. Use procedure p_rep_designer.change_scol_discover_rule or to change the search patterns or procedure p_rep_designer.remove_scol_discover_rule to remove the rule.If the column was registered explicitly you have to use procedure p_rep_designer.unregister_scol to unregister the column.
Example
1EXEC p_rep_designer.unregister_scol('WILLIAMS', 'CUSTOMER', 'CREDITLIMIT');
To determine, which way the column was added (by a search rule or explicitly), query column SOURCE in table REP_SENSITIVE_COLUMNS: “INT” means the column was added using a search rule, while “DES” means it was registered explicitly by the column name.
2.6. Grant/revoke access on object groups
After creating an object group nobody has access to the objects in that group. To gain access explicit grants have to be provided to the users. The following steps show how to provide those grants.
2.6.1. List existing access privileges to object groups
To produce a list of all existing access grants on object groups query table REP_USER_OG_ACCESS.
Example
 1   SELECT
 2         object_group,
 3         username,
 4         rw_access,
 5         scol_access,
 6         source
 7    FROM rep_user_og_access
 8ORDER BY object_group, username;
 9
10OBJECT_GROUP      USERNAME          RW_ACCESS SCOL_ACCESS SOURCE
11----------------- ----------------- --------- ----------- ------
12MyTestGroup       HUBER             N         M           OPR
13MyTestGroup       KMEIER            N         N           OPR
14U$WILLIAMS        YELLOW            N         Y           OPR
The meaning of values in column SCOL_ACCESS (sensitive column access):
“N”= no access (NULL values shown)
“M”= masked (redacted) access
“Y”= access to the real data
2.6.2. Grant object group access to a user
Use procedure p_rep_oper.grant_user_og_access to grant access on object groups to users. After granting, the user will have access to the tables that are part of the object group, but not to data within these tables. To get access to data the user must be granted access to tenants within the object group using procedure p_rep_oper.grant_user_tnt_access (see section Grant/revoke access on tenants). There is one exception: if the tenant group was defined with a default tenant code then all users are able to see data within this default tenant code. To check this look at column def_tnt_code in table rep_tenant_groups.
A user holding DBA or SCURTY operator privileges may execute procedure p_rep_oper.grant_user_og_access. For the separation of duties, object group creation and grants on object groups have to be performed by users holding different roles. If the same person should accomplish both tasks simply grant the respective administrative roles to this person using procedure p_rep_admin.grant_admin_role (see section Grant administrative privileges to a user).
Example
The following example grants read/write access (third parameter = TRUE) but no sensitive column access (fourth parameter = FALSE) on object group AppB to user YELLOW. The tenant mode is set to ‘RLT’, which is the default, anyway. The last parameter determines if redaction (masking) will be used if no sensitive column access was granted. This combination results in an “M” (for “masked”) in the query below.
1EXEC p_rep_oper.grant_user_og_access('YELLOW', 'AppB', TRUE, FALSE, 'RLT', TRUE);
The changes are visible in table rep_user_og_access:
 1  SELECT
 2         object_group,
 3         username,
 4         rw_access,
 5         scol_access,
 6         source
 7    FROM rep_user_og_access
 8ORDER BY object_group, username;
 9
10OBJECT_GROUP      USERNAME          RW_ACCESS SCOL_ACCESS SOURCE
11----------------- ----------------- --------- ----------- ------
12AppB              YELLOW            Y         M           OPR
13MyTestGroup       HUBER             N         M           OPR
14MyTestGroup       KMEIER            N         N           OPR
15U$WILLIAMS        YELLOW            N         Y           OPR
2.6.3. Revoke object group access from a user
To revoke object group access from a user use procedure p_rep_oper.revoke_user_og_access. A user holding DBA or SCURTY operator privileges may execute this procedure.
2.7. Define tenants and tenant groups
Tenants are columns containing data which is used as criteria to decide at the row level whether data access should be provided or not. In other words a tenant can be used to filter data in a similar way to a SQL WHERE condition. This filter can’t, however, be influenced by the user.
For example a sales representative should only be allowed to view data for his or customers. Other customers should be completely invisible or should be shown without data in sensitive columns, such as CREDITLIMIT. One way of doing this would be to filter data by the customer ID (column CUSTID). This column is called the tenant column and the values of the column are the tenant codes.
For the same tenant the column names may differ in different tables. Even the tenant codes may differ in format or data type from table to table. However, all these expressions of a tenant belong to one tenant group. Access will be granted to such tenant groups, the proper where clause is constructed internally by SCURTY based on the individual tenant definition of a table.
A table can belong to many tenant groups. In order to see a specific row a user must have access to all these tenant groups.
Inspect your data model to identify the columns that should be used to filter data. In a second step define these columns as tenant columns in SCURTY.
The third step (see section Grant/revoke access on tenants) is to provide access rights that filter data according to your needs.
2.7.1. List existing tenant columns
To produce a list of all existing tenant column definitions query table REP_AVAILABLE_TNT_COLUMNS.
 1   SELECT
 2         table_owner,
 3         table_name,
 4         tnt_group,
 5         tnt_name,
 6         tnt_data_type,
 7         column_name
 8    FROM rep_available_tnt_columns
 9ORDER BY
10         tnt_group, tnt_name, table_name;
11
12                                                    TNT_DATA_
13TABLE_OWNER TABLE_NAME TNT_GROUP    TNT_NAME        TYPE      COLUMN_NAME
14----------- ---------- ------------ --------------- --------- -----------
15SCOTT       BONUS      CUSTOMER     SCOTT-TEXT      TEXT      ENAME
16SCOTT       CUSTOMER   CUSTOMER     SCOTT-TEXT      TEXT      ADDRESS
17SCOTT       DEPT       CUSTOMER     SCOTT-TEXT      TEXT      DNAME
18SCOTT       EMP        CUSTOMER     SCOTT-TEXT      TEXT      ENAME
19SCOTT       ORD        CUSTOMER     SCOTT-TEXT      TEXT      COMMPLAN
20SCOTT       PRODUCT    CUSTOMER     SCOTT-TEXT      TEXT      DESCRIP
21WILLIAMS    CUSTOMER   CUSTOMER     WILLIAMS-SCHEMA NUMERIC   CUSTID
2.7.2. List existing tenant groups
To produce a list of all existing tenant groups query table REP_TENANT_GROUPS.
 1   SELECT
 2         tnt_group,
 3         tnt_group_desc,
 4         all_tnt_code,
 5         def_tnt_code,
 6         sec_ctx,
 7         usr_ctx
 8    FROM rep_tenant_groups
 9ORDER BY tnt_group;
10
11TNT_GROUP  TNT_GROUP_DESC       ALL_TNT_CODE DEF_TNT_CODE SEC_CTX USR_CTX
12---------- -------------------- ------------ ------------ ------- -------
13BDATE      business date        ALL                       N       Y
14CUSTOMER   selected customers   ALL          100          Y       Y
15DST_TYP                         ALL                       Y       Y
16INSTITUT   Institut             ALL          41000        Y       Y
17TDATE      technical validity   ALL                       N       Y
2.7.3. List existing tenants and groups
To produce a list of all existing tenants query table REP_TENANTS, for tenant groups use REP_TENANT_GROUPS. A combined and detailed overview is available in REP_TENANT_DETAILS.
2.7.4. Create a tenant group
A new tenant group is created by executing procedure p_rep_admin.add_tnt_group.
Example
Create a new tenant group named AppBCustomer with the comment ‘Customers present in Application B’ with an all tenant code named ALL. Users holding a tenant code ALL then have access to all tenant codes within the tenant group.
The example defines a default tenant code 100 which means that data with this tenant code is visible to all users. The tenant codes in this group must be made up of 2-4 digits. The tenant group is activated for the security context and the user context. The tenant codes must be numeric.
1EXEC p_rep_admin.add_tnt_group('AppBCustomer', 'Customers present in Application B', 'ALL', '100', '[0-9]{2,4}', TRUE, TRUE, 'NUMERIC');
2.7.5. Define a tenant
A new tenant definition is created by procedure p_rep_admin.add_tenant.
Example
Create a tenant definition named custid in tenant group AppBCustomer. No comment is provided (NULL) and tnt_match_prio = 0 is the highest priority. This means that the rule supersedes other possible rules for the tenant if they match different columns within the same table.
The tenant data type has to be NUMERIC. Only columns exactly named custid in schema WILLIAMS will be added, regardless of the table name or column comment. No exclusion pattern (e.g. to exclude columns with specific comments), tenant conversion function or tenant column function is provided (NULL values).
1EXEC p_rep_admin.add_tenant ('CUSTOMER', 'custid', NULL, 0, 'TEXT', 'custid', NULL, 'williams', NULL, '.*', NULL, '.*', NULL, NULL, NULL);
2.8. Grant/revoke access on tenants
You have now defined tenant columns that can be used as criteria to decide at the row level whether data access should be provided or not.
To do so you have to grant access on specific or all values to users.
Rows that contain these values in the tenant column will then be accessible to the user.
If access has not been granted on a tenant, the user will not see any data within the table or a view based on the table.
If more than one tenant group is used on a table, access groups may be used to raise flexibility with tenant grants. Every grant on a tenant belongs to an access group. If no access group is specified, the group named “DEFAULT” is used. Access groups are combined by a logical OR. Depending on the tenant codes granted on one tenant group, different tenant codes can be granted on the other tenant group(s). This is not possible without using access groups. Without using named access groups, all tenant privileges are combined by a logical AND.
2.8.1. List existing grants on tenants
To produce a list of all existing grants on tenants query table REP_USER_TNT_ACCESS.
Example
 1  SELECT object_group,
 2         username,
 3         tnt_group,
 4         tnt_code,
 5         scol_access,
 6         source,
 7         access_group
 8    FROM rep_user_tnt_access
 9ORDER BY object_group,
10         username,
11         tnt_group,
12         tnt_code;
13
14OBJECT_GROUP USERNAME TNT_GROUP TNT_CODE SCOL_ACCESS SOURCE ACCESS_GROUP
15------------ -------- --------- -------- ----------- ------ ------------
16MyTestGroup  KMEIER   INSTITUT  ALL      Y           OPR    DEFAULT
17U$WILLIAMS   BLUE     CUSTOMER  100      N           OPR    DEFAULT
18U$WILLIAMS   BLUE     CUSTOMER  105      N           OPR    DEFAULT
19U$WILLIAMS   BLUE     CUSTOMER  107      N           OPR    OWN_GROUP
20U$WILLIAMS   YELLOW   CUSTOMER  100      Y           OPR    DEFAULT
21U$WILLIAMS   YELLOW   CUSTOMER  101      N           OPR    DEFAULT
22U$WILLIAMS   YELLOW   CUSTOMER  102      N           OPR    OWN_GROUP
23U$WILLIAMS   YELLOW   CUSTOMER  103      Y           OPR    OWN_GROUP
The query result shows that user KMEIER has access to all tenants of tenant group institut in object group MyTestGroup, including access to sensitive columns. Users BLUE and YELLOW have access to specific tenants and to sensitive columns for a subset of these tenants. If only one tenant group exists on a table, it makes no difference if named access groups are used or not.
2.8.2. Grant access on tenants
Use procedure p_rep_oper.grant_user_tnt_access to grant access on tenants to users.
A user holding DBA or SCURTY operator privileges may execute procedure p_rep_oper.grant_user_tnt_access. For separation of duties creating tenants and tenant groups has to be performed by users holding different roles than providing access rights on tenants. If the same person should accomplish both tasks, simply grant the respective administrative roles to this person using procedure p_rep_admin.grant_admin_role.
Example
Grant access on tenants 105 and 106 with sensitive column access (last parameter = TRUE) on object group AppB and tenant group AppBCustomer to user YELLOW. As there is no access group name provided, the grants are valid for the access group DEFAULT.
1EXEC p_rep_oper.grant_user_tnt_access('YELLOW', 'AppB', 'AppBCustomer', scurty_t_lov('105', '106'), TRUE);
If more than one tenant group exists for the same object group, the user will see only the intersection of the grants. For example if access is granted on tenants 103, 104 and 105 for one tenant group and 105 and 106 for the other tenant group, the user will only see tenant 105 within the object group (plus the default tenant code if it is the same in both tenant groups).
Note
If an ALL tenant code is provided then all specific tenant codes will be deleted. Inversely, when a specific tenant code is provided then a previous grant to an ALL tenant code will be removed.
Check REP_USER_TNT_ACCESS to get a clear picture which grants are currentlxy in place.
2.8.3. Revoke access on tenants
Use procedure p_rep_oper.revoke_user_tnt_access to revoke access on tenants from users.
If an all-tenants code is provided with this procedure, access to all tenants in this group are revoked, regardless of whether access existed for specific tenant codes or via an all-tenants code.
Example: Revoke access on tenant code 105 in object group AppB and tenant group AppBCustomer from user YELLOW:
1EXEC p_rep_oper.revoke_user_tnt_access('YELLOW', 'AppB', 'AppBCustomer', '105');
Sensitive columns using data redaction (masking)
If a column is registered as a sensitive column, the default behavior is to hide data of this column in all or in some rows, depending upon access rights granted. However, sensitive columns may be configured to show redacted (masked) data instead of NULL values.
The use of sensitive columns without data redaction is described in chapter Register/unregister sensitive columns. This chapter describes how to use data redaction with sensitive columns.
Columns using data redaction (masking) show redacted data depending on object group level access privileges. Tenant privileges for access on sensitive columns are ignored.
Caution
Oracle Data Redaction masks the query result set at runtime. Data stored in the database remains unchanged. SQL WHERE-clauses are never redacted. While this is useful for applications, it bears the risk of enabling users to “guess” data if they repeatedly execute slightly modified queries or use other techniques.
Examples are:
Repeated queries using slightly modified SQL WHERE conditions to narrow down the redacted value.
A SQL UPDATE statement may be used to update a non-redacted column with the (real) value of a redacted column. This is possible because Oracle Redaction only masks query results. After the update, the non-redacted column will reveal the real value of the redacted column.
2.8.4. Activate/Deactivate Oracle Redaction within SCURTY
Caution
Oracle Data Redaction is not part of the Oracle Enterprise Edition and must be licensed separately as part of the Advanced Security Option.
SCURTY prevents the unintended use of Oracle Redaction. To activate Oracle Redaction for use with SCURTY, use procedure set the parameter rep_use_data_redaction to TRUE.
Do not enable SCURTY redaction features if you are not licensed properly.
To deactivate Oracle Redaction for use with SCURTY, two steps are necessary:
Set parameter p_dr_mode to N using procedure p_rep_designer.set_scol_dr_params for all sensitive columns using data redaction and wait until the policies are removed by the refresh process.
Only after step one is fished, deactivate Oracle Redaction for use with SCURTY by setting parameter rep_use_data_redaction to FALSE. The reason why two steps are necessary is that setting parameter rep_use_data_redaction to FALSE prevents the definition of new redacted columns but does not affect existing ones. Once parameter rep_use_data_redaction is set to FALSE, the refresh process will no longer change redaction definitions of columns. This means, Oracle Redaction is still in use after parameter rep_use_data_redaction is set to FALSE if sensitive columns were already defined to show redacted values. Therefore, redaction definitions need to be removed from these columns prior to deactivating Oracle Redaction for use with SCURTY as described above.
Example: deactivation of Oracle Redaction
Check, which columns use data redaction:
1SELECT * FROM rep_sensitive_columns WHERE dr_mode != 'N';
Deactivate data redaction for all columns listed by the SQL stamtement above. In this example, the redaction definition is removed from column ‘COMMISSION_PCT’ in table ‘EMPLOYEES’, schema ‘HR’:
1EXEC p_rep_designer.set_scol_dr_params('HR', 'EMPLOYEES', 'COMMISSION_PCT', 'N');
Check and wait until the redaction policies are removed. Query Oracle data dictionary view REDACTION_POLICIES (public synonym). To query this view, at least database role SELECT_CATALOG_ROLE is required:
1SELECT * FROM redaction_policies;
Deactivate SCURTY’s usage of Oracle Redaction by setting parameter rep_use_data_redaction to FALSE:
1EXEC p_rep_admin.set_param('rep_use_data_redaction', false);
2.8.5. Enable a sensitive column to use data redaction
With data redaction (masking) enabled, columns may be configured to show masked query results. Two procedures exist to set data redaction parameters of a column: • For new sensitive columns: use procedure p_rep_designer.register_scol to enable data redaction immediately when registering a column as sensitive. • For existing sensitive columns: add, change or remove data redaction settings for a column that was already registered as a sensitive column. This is also possible for columns that were registered using a search rule by procedure p_rep_designer.add_scol_discover_rule.
Example
To illustrate, we have a table containing employee information. The table is called EMPLOYEES and contains data which is listed below.
DEPT FIRST_NAME   LAST_NAME    PHONE             JOB_ID     SALARY
---- ------------ ------------ ----------------- --------- -------
   1 Steven       King         0664 1234567      AD_PRES     24000
   1 Neena        Kochhar      0664 1234568      AD_VP       17000
   1 Hermann      Baer         0664 1238888      PR_REP       7000
   1 Susan        Mavris       0664 1237777      HR_REP       6500
   1 Pat          Fay          603.123.6666      MK_REP       6000
   1 Michael      Hartstein    0664 1235555      MK_MAN       8300
   1 Jennifer     Whalen       0664 1234444      AD_ASST      3400
   1 Lex          De Haan      0664 1234569      AD_VP       17000
   2 Hazel        Philtanker   +43 660 521634    ST_CLERK     2200
   2 Michael      Rogers       +43 660 521834    ST_CLERK     2900
   2 Ki           Gee          +43 660 521734    ST_CLERK     2400
   3 Sundita      Kumar        0676 34329268     SA_REP       6100
   3 Ellen        Müller       0677 22429267     SA_REP       8200
   3 Elizabeth    Müller       0676 34529268     SA_REP       7300
   4 Stephen      Stiles       +43 681 542034    ST_CLERK     3200
   4 Renske       Ladwig       +43 681 541234    ST_CLERK     3600
   6 James        Marlow       +43 677 5237234   ST_CLERK     2500
   6 Jason        Mallin       +43 660 521934    ST_CLERK     3000
   6 TJ           Olson        +43 677 5238234   ST_CLERK     2100
   7 Trenna       Rajs         +43 681 548009    ST_CLERK     3500
   7 Curtis       Davies       +43 681 542994    ST_CLERK     3100
   7 John         Seo          +43 681 542019    ST_CLERK     2700
   7 Joshua       Patel        +43 681 541834    ST_CLERK     2500
An existing sensitive column is configured to show redacted values and three columns are newly defined as sensitive, with or without redaction:
Redaction parameters are set for a column that was registered as a sensitive column before. Procedure p_rep_designer.set_scol_dr_params is used to set all values in the query output of column LAST_NAME in table EMPLOYEES from schema HR to random generated values (‘R’):
1EXEC p_rep_designer.set_scol_dr_params('HR', 'EMPLOYEES', 'LAST_NAME', 'R');
Column SALARY is registered as a sensitive column without data redaction (‘N’):
1EXEC p_rep_designer.register_scol('HR', 'EMPLOYEES', 'SALARY', TRUE, 'N');
Column PHONE is registered as a sensitive column using data redaction. Original data is analyzed and potentially masked if the search rule of a regular expression (‘E’) returns a hit.
Only country and area code should be exposed to users that lack access privileges to sensitive columns. The local number should be redacted. We assume, the local number is always separated from the area code by a blank or a “.”.
The search string contains two subexpressions: the first one accepts zero more occurrences of any character “(.*)”. The second one looks for a blank or a “.” followed by zero more occurrences of any character at the end of the string (“$”). A back reference (“\1”) is used to show the parts of original data preceding the local number and concatenates this content with the text “ redacted”:
1EXEC p_rep_designer.register_scol('HR', 'EMPLOYEES', 'PHONE', TRUE, 'E', '(.*)(( |\.).*$)','\1 redacted');
Column JOB_ID is registered as a sensitive column using partial data redaction (‘P’). Characters in the position of the “F” in the search mask (“VVFVVVVV”) will be substituted by a “-” (replace mask: “VV-VVVVV”).
Note: the two masks need to be identical except for the “F”s in the search mask which are replaced by the letters in the same position in the replace mask.
Characters behind positions of the “V”s are replaced by “*”, starting from the 3rd to the 5th “V”. Characters behind the “V”s number 6 and 7 are shown in clear text. Strings longer than the masks will be truncated:
1EXEC p_rep_designer.register_scol('HR', 'EMPLOYEES', 'JOB_ID', TRUE, 'P', p_dr_function_parameters => 'VVFVVVVV,VV-VVVVV,*,3,5');
User HU1 is granted access on the object group containing the above table. The following additional access details are provided with this grant:
no sensitive column access (FALSE)
the use of data redaction (masking) for sensitive columns (last parameter = TRUE)
Column level tenant access if tenant privileges are granted (“CLT)
1EXEC p_rep_oper.grant_user_og_access ('HU1', 'OG_HR', TRUE, FALSE, 'CLT', TRUE);
The combination of “no sensitive column access” with “use redaction for sensitive columns” is stored as an “M” in table REP_USER_OG_ACCESS, column SCOL_ACCESS.
User HU1 queries the table.
Columns last_name, phone and job_id are redacted, column salary shows NULL values:
DEPT FIRST_NAME  LAST_NAME   PHONE             JOB_ID   SALARY
---- ----------- ----------- ----------------- ------- -------
   1 Steven      hxF+        0664 redacted     AD-**E
   1 Neena       I<D`On6     0664 redacted     AD-**
   1 Hermann     CT*~        0664 redacted     PR-**P
   1 Susan       SYEcf7      0664 redacted     HR-**P
   1 Pat         R]y         603.123 redacted  MK-**P
   1 Michael     E.@"XfgTM   0664 redacted     MK-**N
   1 Jennifer    'Sw376      0664 redacted     AD-**S
   1 Lex         [N_4P9Z     0664 redacted     AD-**
   2 Hazel       q=yzP&1gyE  +43 660 redacted  ST-**E
   2 Michael     F.r>Qb      +43 660 redacted  ST-**E
   2 Ki          `~s         +43 660 redacted  ST-**E
   3 Sundita     4S`Q1       0676 redacted     SA-**P
   3 Ellen       ? O;$bz     0677 redacted     SA-**P
   3 Elizabeth   s-]XV,j     0676 redacted     SA-**P
   4 Stephen     j9An!h      +43 681 redacted  ST-**E
   4 Renske      `jO\W3      +43 681 redacted  ST-**E
   6 James       g97O=U      +43 677 redacted  ST-**E
   6 Jason       /-&';m      +43 660 redacted  ST-**E
   6 TJ          G6-w>       +43 677 redacted  ST-**E
   7 Trenna      =2;S        +43 681 redacted  ST-**E
   7 Curtis      -8&d}Q      +43 681 redacted  ST-**E
   7 John        eYY         +43 681 redacted  ST-**E
   7 Joshua      M0=/f       +43 681 redacted  ST-**E
A tenant group and a tenant is set up and user HU1 gets access on some tenant codes:
Tenant group “DEPT” is created with an all tenant code “ALL”. Users who get “ALL” granted as a tenant code will see all records:
1EXEC p_rep_admin.add_tnt_group ('DEPT', 'Department', 'ALL', NULL, NULL, TRUE, TRUE, NULL);
A tenant is added to the tenant group that includes numeric columns with the name DEPT or DEPT_ID in objects of the HR schema:
1EXEC p_rep_admin.add_tenant ('DEPT', 'DEPT', 'Department numbers', 1, 'NUMERIC', '(DEPT|DEPT_ID)', NULL, 'HR', NULL, '.*', NULL, '.*', NULL, NULL, NULL);
User HU1 is granted access on data within the tenant column(s).
HU1 is allowed to see the value 1 with sensitive column access (“TRUE”). This grant is part of access group “DEFAULT”:
1EXEC p_rep_oper.grant_user_tnt_access('HU1', 'OG_HR', 'DEPT', 1, TRUE, 'DEFAULT');
User HU1 is allowed to see tenant values 2 to 9 without sensitive column access (“FALSE”). This grant is part of access group “MK_REP_GRP”:
1EXEC p_rep_oper.grant_user_tnt_access('HU1', 'OG_HR', 'DEPT', scurty_t_lov(2,3,4), FALSE, 'MK_REP_GRP');
User HU1 queries the table again.
The output is shown in RLT mode because no CLT column has been registered for this tenant group yet. This means, result rows are restricted to those with tenant code privileges.
Columns PHONE and JOB_ID are redacted for all rows, because tenant privileges are overruled by object group privileges for redacted columns. Column salary shows real data for department 1 (column DEPT) and NULL values for all other departments. The reason is, column SALARY is a sensitive column without data redaction configuration and therefore the tenant grant is relevant for sensitive column access:
DEPT FIRST_NAME  LAST_NAME   PHONE             JOB_ID    SALARY
---- ----------- ----------- ----------------- --------- ------
   1 Steven      LuYM        0664 redacted     AD-***S    24000
   1 Hermann     Z*Mb        0664 redacted     PR-***      7000
   1 Lex         `, 6G_M     0664 redacted     AD-**      17000
   1 Neena       )VfkH:W     0664 redacted     AD-**      17000
   1 Susan       W(W`B6      0664 redacted     HR-***      6500
   1 Pat         Gar         603.123 redacted  MK-***      6000
   1 Michael     8yuN;uVY@   0664 redacted     MK-***      8300
   1 Jennifer    !,Hzm"      0664 redacted     AD-***T     3400
   2 Hazel       \\L(s`T<dd  +43 660 redacted  ST-***RK
   2 Ki          11P         +43 660 redacted  ST-***RK
   2 Michael     h!Rk,/      +43 660 redacted  ST-***RK
   3 Elizabeth   ?yw`gJ0     0676 redacted     SA-***
   3 Sundita     Si!R1       0676 redacted     SA-***
   3 Ellen       \K3`h8X     0677 redacted     SA-***
   4 Stephen     !}DDNC      +43 681 redacted  ST-***RK
   4 Renske      ^bA%ym      +43 681 redacted  ST-***RK
To remove redaction from column PHONE, parameter p_dr_mode is set to “N”:
1EXEC p_rep_designer.set_scol_dr_params ('HR', 'EMPLOYEES', 'PHONE', 'N');
To unregister sensitive column JOB_ID execute the following statement:
1EXEC p_rep_designer.unregister_scol('HR', 'EMPLOYEES', 'JOB_ID');
Column PHONE should be shown only for the rows with tenant access privileges:
1EXEC p_rep_designer.register_clt_col('HR', 'EMPLOYEES', 'PHONE', 'DEPT', true);
With CLT mode, only tenant grants of access group “DEFAULT” are active. Grants from other access groups are ignored. Further, object group privileges on sensitive columns determine if a column is shown in clear text, redacted or as a NULL value. Therefore, the query output shows all columns for DEPT = 1 and only columns not registered as CLT or tenant columns for the rest of the output.
Column PHONE is registered as a CLT column and therefore the query output shows redacted values for rows tenant access while the other rows show NULL values. Object group settings still govern if the value is shown redacted or not:
DEPT FIRST_NAME  LAST_NAME   PHONE             JOB_ID    SALARY
---- ----------- ----------- ----------------- --------- ------
   1 Steven      ]yN<        0664 redacted     AD-***S    24000
   1 Neena        %+2MlS     0664 redacted     AD-**      17000
   1 Hermann     9JQJ        0664 redacted     PR-***      7000
   1 Susan       6O8^t-      0664 redacted     HR-***      6500
   1 Pat         )xe         603.123 redacted  MK-***      6000
   1 Michael     ;*^`P%|>C   0664 redacted     MK-***      8300
   1 Jennifer    qpcI)Y      0664 redacted     AD-***T     3400
   1 Lex         6W{1&xb     0664 redacted     AD-**      17000
     Hazel       1dP&qOA.9l                    ST-***RK
     Joshua      PL&?C                         ST-***RK
     Stephen     1w^SL3                        ST-***RK
     John        j3?                           ST-***RK
     Trenna      $HqE                          ST-***RK
     Curtis      r~o{v[                        ST-***RK
     Elizabeth   4Y#)=h'                       SA-***
     Sundita     4V-_H                         SA-***
     Ki          @#!                           ST-***RK
     Michael     %:={6j                        ST-***RK
     Jason       :A9H]-                        ST-***RK
     TJ          &1jSu                         ST-***RK
     James       ;,a7Gf                        ST-***RK
     Ellen       %{tdJ69                       SA-***
     Renske      ~.$Xb3                        ST-***RK
2.9. Using tenants with different access groups
Access groups add flexibility if more than one tenant group is active on a table. Privileges from different access groups are combined by a logical OR while privileges within an access group are combined by logical AND.
Example
This example requires at least the object group and tenants of the previous example, chapter Sensitive columns using data redaction (masking):
The EMPLOYEES table is part for object group OG_HR and tenant group DEPT. Tenant grants for two different access groups “DEFAULT” and “MK_REP_GRP” exist for user HU1. Columns PHONE and JOB_ID are unregistered as sensitive columns.
Another tenant group and a tenant is set up and user HU1 gets access on some tenant codes:
Tenant group JOBS is created with an all tenant code “ALL”. Users who get “ALL” granted as a tenant code will see all records:
1EXEC p_rep_admin.add_tnt_group ('JOBS', 'Job types', 'ALL', NULL, NULL, TRUE, TRUE, NULL);
A tenant is added to the tenant group that includes text columns with the name “JOB_ID” in objects of the HR schema:
1EXEC p_rep_admin.add_tenant ('JOBS', 'JOBS', 'Job IDs', 1, 'TEXT', 'JOB_ID', NULL, 'HR', NULL, '.*', NULL, '.*', NULL, NULL, NULL);
User HU1 is granted access on data within the tenant column(s).
HU1 is allowed to see a list of tenant codes for JOB_IDs that are part of department 1. This department is part of access group “DEFAULT”, so the list of tenant codes for the JOB_IDs goes to this access group. Sensitive column access is provided for these tenant codes (TRUE)
1EXEC p_rep_oper.grant_user_tnt_access('HU1', 'OG_HR', 'JOBS', scurty_t_lov('PR_REP','HR_REP','MK_REP','MK_MAN'), TRUE, 'DEFAULT');
The user is allowed to see all tenant values in the other granted departments. As these departments were granted using access group “MK_REP_GRP”, the “ALL” privilege on JOB_IDs uses the same access group. Sensitive column access is not provided for these tenant codes (FALSE):
1EXEC p_rep_oper.grant_user_tnt_access('HU1', 'OG_HR', 'JOBS', 'ALL', FALSE, 'MK_REP_GRP');
User HU1 queries the table again.
Only rows of department 1 with the four granted JOB_IDs are shown. This is because with CLT mode, only grants provided for access group “DEFAULT” are effective. Sensitive column SALARY shows real values because the tenant grant was provided with sensitive column access.
As there is no CLT column registered for tenant group JOBS, RLT mode is used to display results for this tenant group. This reduces the query result to four rows:
DEPT FIRST_NAME  LAST_NAME   PHONE             JOB_ID    SALARY
---- ----------- ----------- ----------------- --------- ------
   1 Michael     Hartstein   0664 1235555      MK_MAN      8300
   1 Hermann     Baer        0664 1238888      PR_REP      7000
   1 Susan       Mavris      0664 1237777      HR_REP      6500
   1 Pat         Fay         603.123.6666      MK_REP      6000
Query output with CLT mode for all tenant groups
Register another CLT column to show all rows To show all rows of the table for columns that are not registered as tenant or CLT columns or restricted as sensitive columns, another CLT column is registered for the second tenant group:
1EXEC p_rep_designer.register_clt_col('HR', 'EMPLOYEES', 'FIRST_NAME', 'JOBS', true);
To unregister sensitive column LAST_NAME execute the following statement:
1EXEC p_rep_designer.unregister_scol('HR', 'EMPLOYEES', 'LAST_NAME');
User HU1 repeats the query:
 1DEPT FIRST_NAME  LAST_NAME   PHONE             JOB_ID    SALARY
 2---- ----------- ----------- ----------------- --------- ------
 3   1 Steven                  0664 1234567
 4   1 Neena                   0664 1234568
 5   1 Hermann     Baer        0664 1238888      PR_REP      7000
 6   1 Susan       Mavris      0664 1237777      HR_REP      6500
 7   1 Pat         Fay         603.123.6666      MK_REP      6000
 8   1 Michael     Hartstein   0664 1235555      MK_MAN      8300
 9   1 Jennifer                0664 1234444
10   1 Lex                     0664 1234569
11     Hazel
12     Joshua
13     Stephen
14     John
15     Trenna
16     Curtis
17     Elizabeth
18     Sundita
19     Ki
20     Michael
21     Jason
22     TJ
23     James
24     Ellen
25     Renske
With CLT mode enabled, only the DEFAULT access group privileges are active.
Explanation of the query output for the different columns: • Tenant column DEPT for tenant group DEPT and JOB_ID for tenant group JOBS show values for rows that were granted on the respective tenant. • Column DEPT shows all 8 rows for value “1” which was granted for access group DEFAULT. Column DEPT is the tenant column for tenant group DEPT. • Column FIRST_NAME shows all records. Row values are not restricted for this column because both tenant groups have CLT columns defined on this table and the object group was granted with CLT mode to user HU1. • Column LAST_NAME is defined as CLT column for tenant group JOBS and therefore only shows records with tenant access privileges for this tenant group. • Column PHONE is defined as CLT column for tenant group DEPT and therefore only shows records with tenant access privileges for this tenant group. • Column JOB_ID shows all 4 rows for values that were granted to the user for access group “DEFAULT”. Column JOB_ID is the tenant column for tenant group JOBS. • Column SALARY is defined as a sensitive column without data redaction (masking). Access privileges were granted on DEPT=1 and on the four granted tenant codes of the JOBS tenant group. Therefore, four records are displayed, while the other rows contain NULL values.
If CLT mode is deactivated, rows are shown for the tenant codes granted for both access groups. CLT mode can be deactivated either by changing the object group grant to “RLT” (plus user logout and login again) or by unregistering all CLT columns of the table.
Changing the object group privilege to RLT:
1EXEC p_rep_oper.grant_user_og_access ('HU1', 'OG_HR', TRUE, FALSE, 'RLT', TRUE);
Note: the changed privilege is active after the next login of the user.
Unregistering a CLT column:
1EXEC p_rep_designer.unregister_clt_col('HR', 'EMPLOYEES', 'PHONE', 'DEPT');
Query output with RLT mode:
DEPT FIRST_NAME  LAST_NAME   PHONE             JOB_ID    SALARY
---- ----------- ----------- ----------------- --------- ------
   1 Michael     Hartstein   0664 1235555      MK_MAN      8300
   1 Susan       Mavris      0664 1237777      HR_REP      6500
   1 Pat         Fay         603.123.6666      MK_REP      6000
   1 Hermann     Baer        0664 1238888      PR_REP      7000
   2 Ki          Gee         +43 660 521734    ST_CLERK
   2 Hazel       Philtanker  +43 660 521634    ST_CLERK
   2 Michael     Rogers      +43 660 521834    ST_CLERK
   3 Ellen       Müller      0677 22429267     SA_REP
   3 Sundita     Kumar       0676 34329268     SA_REP
   3 Elizabeth   Müller      0676 34529268     SA_REP
   4 Renske      Ladwig      +43 681 541234    ST_CLERK
   4 Stephen     Stiles      +43 681 542034    ST_CLERK
Records are shown if tenant codes were granted for both tenant groups. Tenant code grants from all access groups are active. Sensitive column salary shows NULL values if not access privileges on both tenant groups were granted, because it is a sensitive column.
Example: add all columns in schema WILLIAMS that have a column comment containing ‘@security relevant column@’ as sensitive columns