5. Security Module
This module includes object, row and column level security as well as sandboxing and the administration of users and privileges via APIs. Furthermore, the integration of an external identity management system, such as Active Directory belongs to this module. Metadata tables are filled with the respective settings and multiple refreshing jobs apply those settings periodically.
5.1. Administrative Roles
The RED framework provides three admin roles:
R_APPMGR for the application manager
The application manager is responible for the business release process and, therefore, manages the complete TSA, PSA and APB layer. He has access to all related APIs.
R_SECMGR for the security manager
The security manager handles tasks within the SCURTY security framework as described in this chapter and has, therefore, access to the SCURTY APIs.
R_APPMON for monitoring systems and users
These users have only read access on all relevant views and tables within the RED framework.
5.3. Logging onto the system
In 2-tier architectures the authentication happens directly through the database login using a personalized user account.
In 3-tier architectures however, the authentication takes places via an application. The identity of the physical person has to be forwarded to the database in this case. This works by impersonating a technical user (TU). The technical user takes on the identity of the human user (HU), which is logged on via the application, in the database itself. This impersonation function is provided by Exasol databases.
Newer 3-tier systems, like for example MicroStrategy, use personalized user accounts for directly authenticating against the database even if the login happened via a web application.
The next subchapters show the sequence of the authentication process. Additionally, a LDAP-server is included in the description. This is however optional. If no LDAP-server is used the user and password management is done directly by the database.
5.3.1. Authenticating using an LDAP directory
For the authentication against Exasol, an external LDAP-directory can be used. To be able to use a LDAP-directory, it has to be configured in Exasol beforehand. However, the configuration of such an integration of a LDAP directory into Exasol is not part of this guide.
5.3.1.1. Authentication in 2-tier environments
In 2-tier environments the authentication happens directly from the client application to the Exasol database. If a LDAP-directory is configured, the password will be queried from there.
The process covers the following steps:
Client login: A person enters their username and password into the client application and the data is then send to the Exasol database
Password enquiry: The database identifies the username and enquires from the LDAP-directory if the password is correct.
Password confirmation: The LDAP-directory confirms the correctness of the password.
Connection established: The database accepts the login and establishes the user-session to the client application.
The following graphic shows the beforementioned process of a login in a 2-tier system using LDAP.
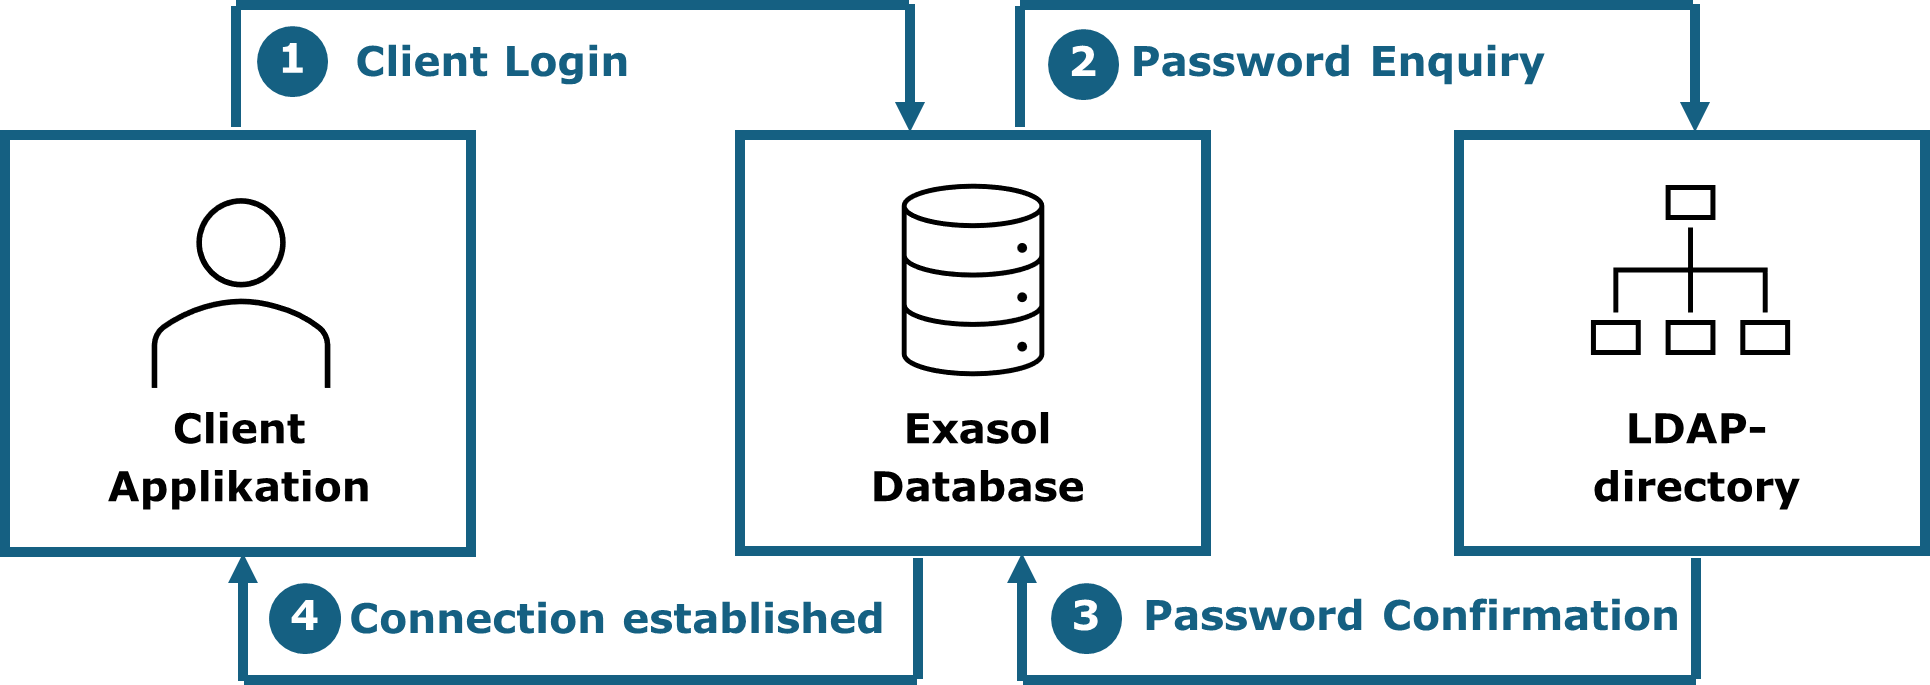
Fig. 5.1 Authentication process in a 2-tier environment
5.3.1.2. Authentication in 3-tier environments
In 3-tier environments the web application authenticates against the application server, which then logs on to the Exasol database. If a LDAP directory is configured, the password is enquired from there. The process follows the steps below:
Someone enters their username and password over the web interface. This data is then sent to the MicroStrategy server.
The MicroStrategy server identifies the username and forwards the data for the login to the database.
The database identifies the username and enquires from the LDAP directory if the password given is correct.
The LDAP directory confirms the correctness of the password, leading to the user being logged on to the database.
The database confirms the successful login to the MicroStrategy server
The MicroStrategy server accepts the login, establishes a user-session and provides the client with the start page.
The following graphic showcases such a login on a 3-tier environment using a LDAP directory.
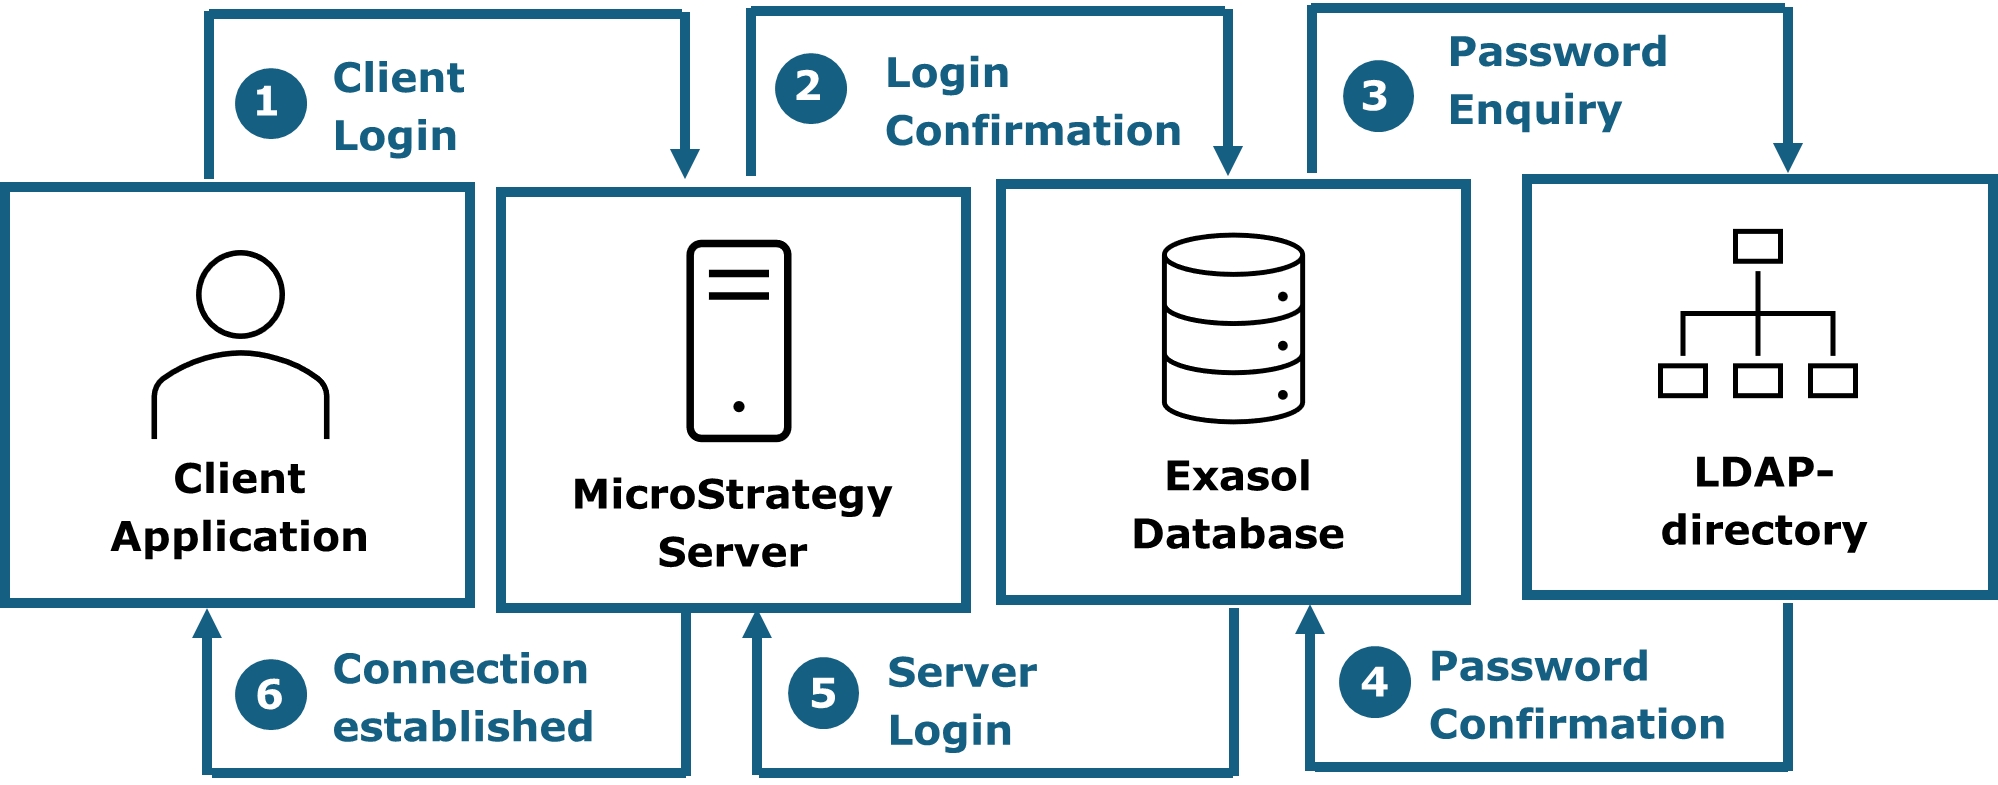
Fig. 5.2 Authentication process in a 3-tier environment
5.4. Administration of user accounts
It is recommended to integrate an external identity management system, however, manual administration of users and rights via APIs is also possible.
Existing user accounts can be found under SCURTY -> Views -> REP_ALL_USERS.
5.4.1. Integration of an external identity management system
The creation of user accounts can be done automatically using an Identity Management System (IDM), if RED is configured to use such a system. The configuration of an IDM for RED is not part of this guide and should best be done in cooperation with Sphinx IT Consulting.
User accounts, sandboxes and rights can be managed automatically by integrating an Identity Management System (IDM) like Active Directory. The integration is done via views that map the respective IDM permission to the security concept (e.g. mapping of AD groups to object groups or tenants).
To add a new user to RED, the relevant access rights need to be set in the IDM, so they can be adopted by RED. User accounts automatically created using IDM, will also be managed by IDM further on. User accounts created that way can be identified in the table SCURTY.REP_ALL_USERS in the column “USER_COMMENT” by a leading “IDM:” in the string.
If a user account was created manually and the authorisation for the framework is then set in the IDM, this does not result in a conflict. The account is not recreated, but instead the permissions are reset to those defined in the IDM.
If RED is configured to use IDM, the current status and access rights of the IDM-provisioned user accounts, can be found in the SCURTY.IDM_% views.
Important
If an external Identity Management System (IDM) is being configured within RED, manually created user accounts with the same name as in the IDM will be updated regularly (usually daily) according to the access rights stored in the IDM.
User accounts that can been automatically created using IDM, will be locked, as soon as the access rights for RED have been revoked in the IDM.
The complete API documentation for the administration of user accounts, object group access and tenant access can be found in the SCURTY API documentation.
5.5. Object Level Security
Object groups (OG) combine database objects into one group. This is done by using search rules in which a search pattern is defined using regular expressions. Such search patterns can be defined for schema names, object names as well as object comments. For each of these three types including and/or excluding patterns can be defined. The patterns are linked using “and”. This means each of the include patterns as well as none of the exclude patterns have to be met for an object to be added to an object group. Due to that, it is also possible to explicitly add or remove objects from an object group by changing the object comment accordingly. Several rules can exist per object group.
Important
If a search rule of an object group does not include any restrictions within a database schema, the whole schema will be added to the object group. This also includes any future existing objects of that schema. A search rule does not have any restrictions if the parameters p_comment_incl_pattern and p_object_incl_pattern are set to ‘.*’ while the parameters p_comment_excl_pattern and p_object_excl_pattern are set to NULL. If a ‘%incl%’ and a ‘%excl%’ parameter hold true at the same time for a schema, an object or a comment, the object is not added to the object group.
An hourly running internal process (REP_REFRESH) checks the search rules and adds or removes objects from object groups according to those defined rules. Objects cannot be manually removed from an object group. Objects can only be removed by editing the search rules accordingly. The timeframe within which the change is picked up by the processes is configurable (SCURTY.ADM_JOBS paragraph “general control tables and views”).
Object groups are implemented as roles in the database and are mainly used for views in the PSV (reporting) layer.
User accounts can be granted access to one or more object groups. Access rights can either be manually granted via LUA scripts by a security manager or automatically using the IDM system. The current access rights are stored in the table SCURTY.REP_USER_OG_ACCESS.
Important
To be able to grant access rights towards object groups, they have to be created first, as access rights can only be allocated to already existing object groups. Existing object groups can be found in the table SCURTY.REP_OBJECT_GROUPS. Furthermore, WRITE access can only be granted to object groups, which have been created with WRITE access and access rights can only be granted to classified user accounts, meaning users from type “HU” and “GU”.
Information from the Identity Management is regularly transferred into the RED framework and saved in the table SECADM.IDM_BASE. A periodically running process called IDM_REFRESH creates access rights depending on that information. These access rights are being saved to SCURTY.REP_USER_OG_ACCESS same as if granted manually.
The timeframe for when the IDM_REFRESH process should run is configurable and saved to the table SECADM.ADM_PARAMS (par_name = 'idm_refresh')
Attention
If IDM is configured and access rights of a user account, which is managed by IDM, are modified manually, these modifications will be reversed with the next IDM refresh run.
Important
The fact that a user has access to an object group does not necessarily mean that he or she has access to data. Row or column level security might prevent the user from even seeing a single row.
5.6. Row Level Security
Access to data in the PSV views can be restricted at row level depending on the user account. For example, access can be limited to a particular business domain or every other suitable attribute. For this purpose, table fields are identified which can be used to decide whether access to a row is granted. Such a field then belongs to a security tenant. Examples of possible tenant columns are BDOMAIN, BRANCH or REGION.
A user account is granted access to one or more tenants, depending on the object group. A tenant works like an implicit SQL Where condition that is fixed and cannot be changed. Access to certain tenants is again done either manually by a security manager or automatically by an IDM system.
An example for row level security can be seen in Figure 5.6. Here the access to rows is limited according to the DEPARTMENT column values as well as the INSTITUTE column values.
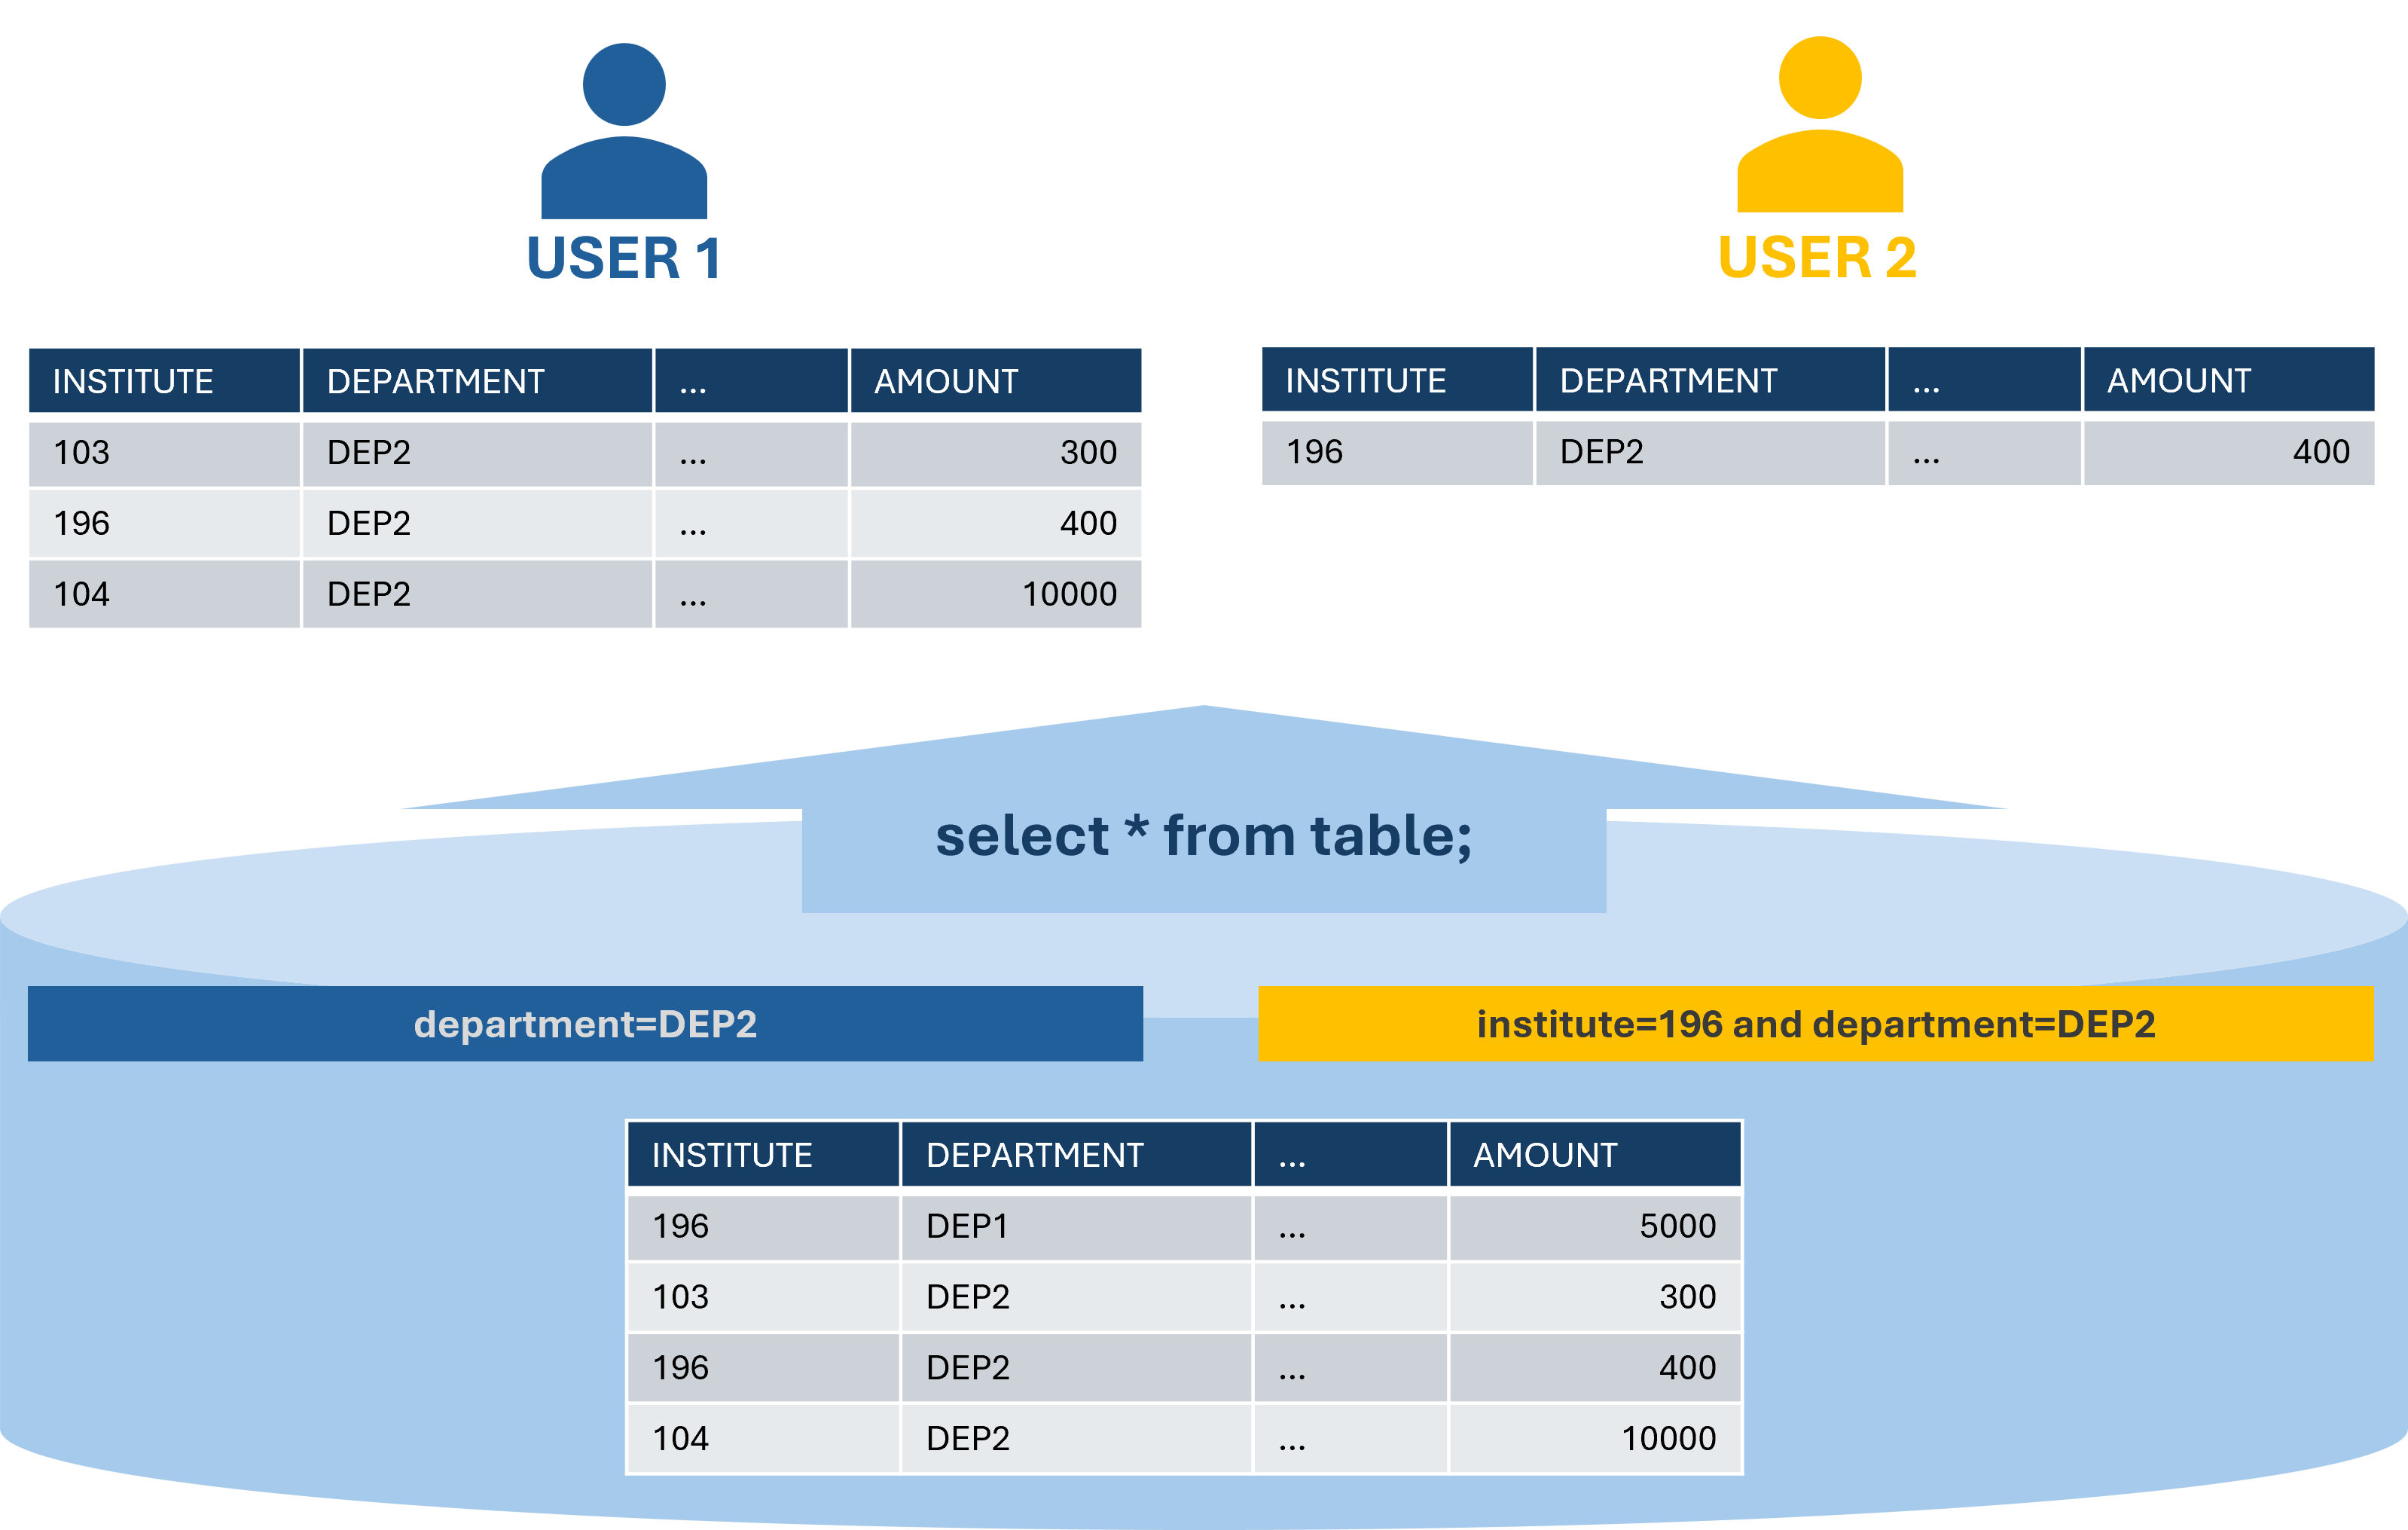
Fig. 5.3 Example for Row Level Security
5.7. Column Level Security
In addition, access to data in the PSV views can be restricted at column level depending on the user account. For example, access can be limited for specific sensitive columns (e.g. marginal return, …). Those columns must be defined in a similar way to tenants in the chapter above. The select list of a table with sensitive columns will be modified and cannot be changed. Depending on the access, a user will either be able to see the column value or just null. Access to sensitive columns is again done either manually by a security manager or automatically by an IDM system.
An example for column level security can be seen in Figure 5.7. Here the access to sensitive columns, in this case the column ‘AMOUNT’, is limited according to the ‘INSTITUTE’ column values and the user.
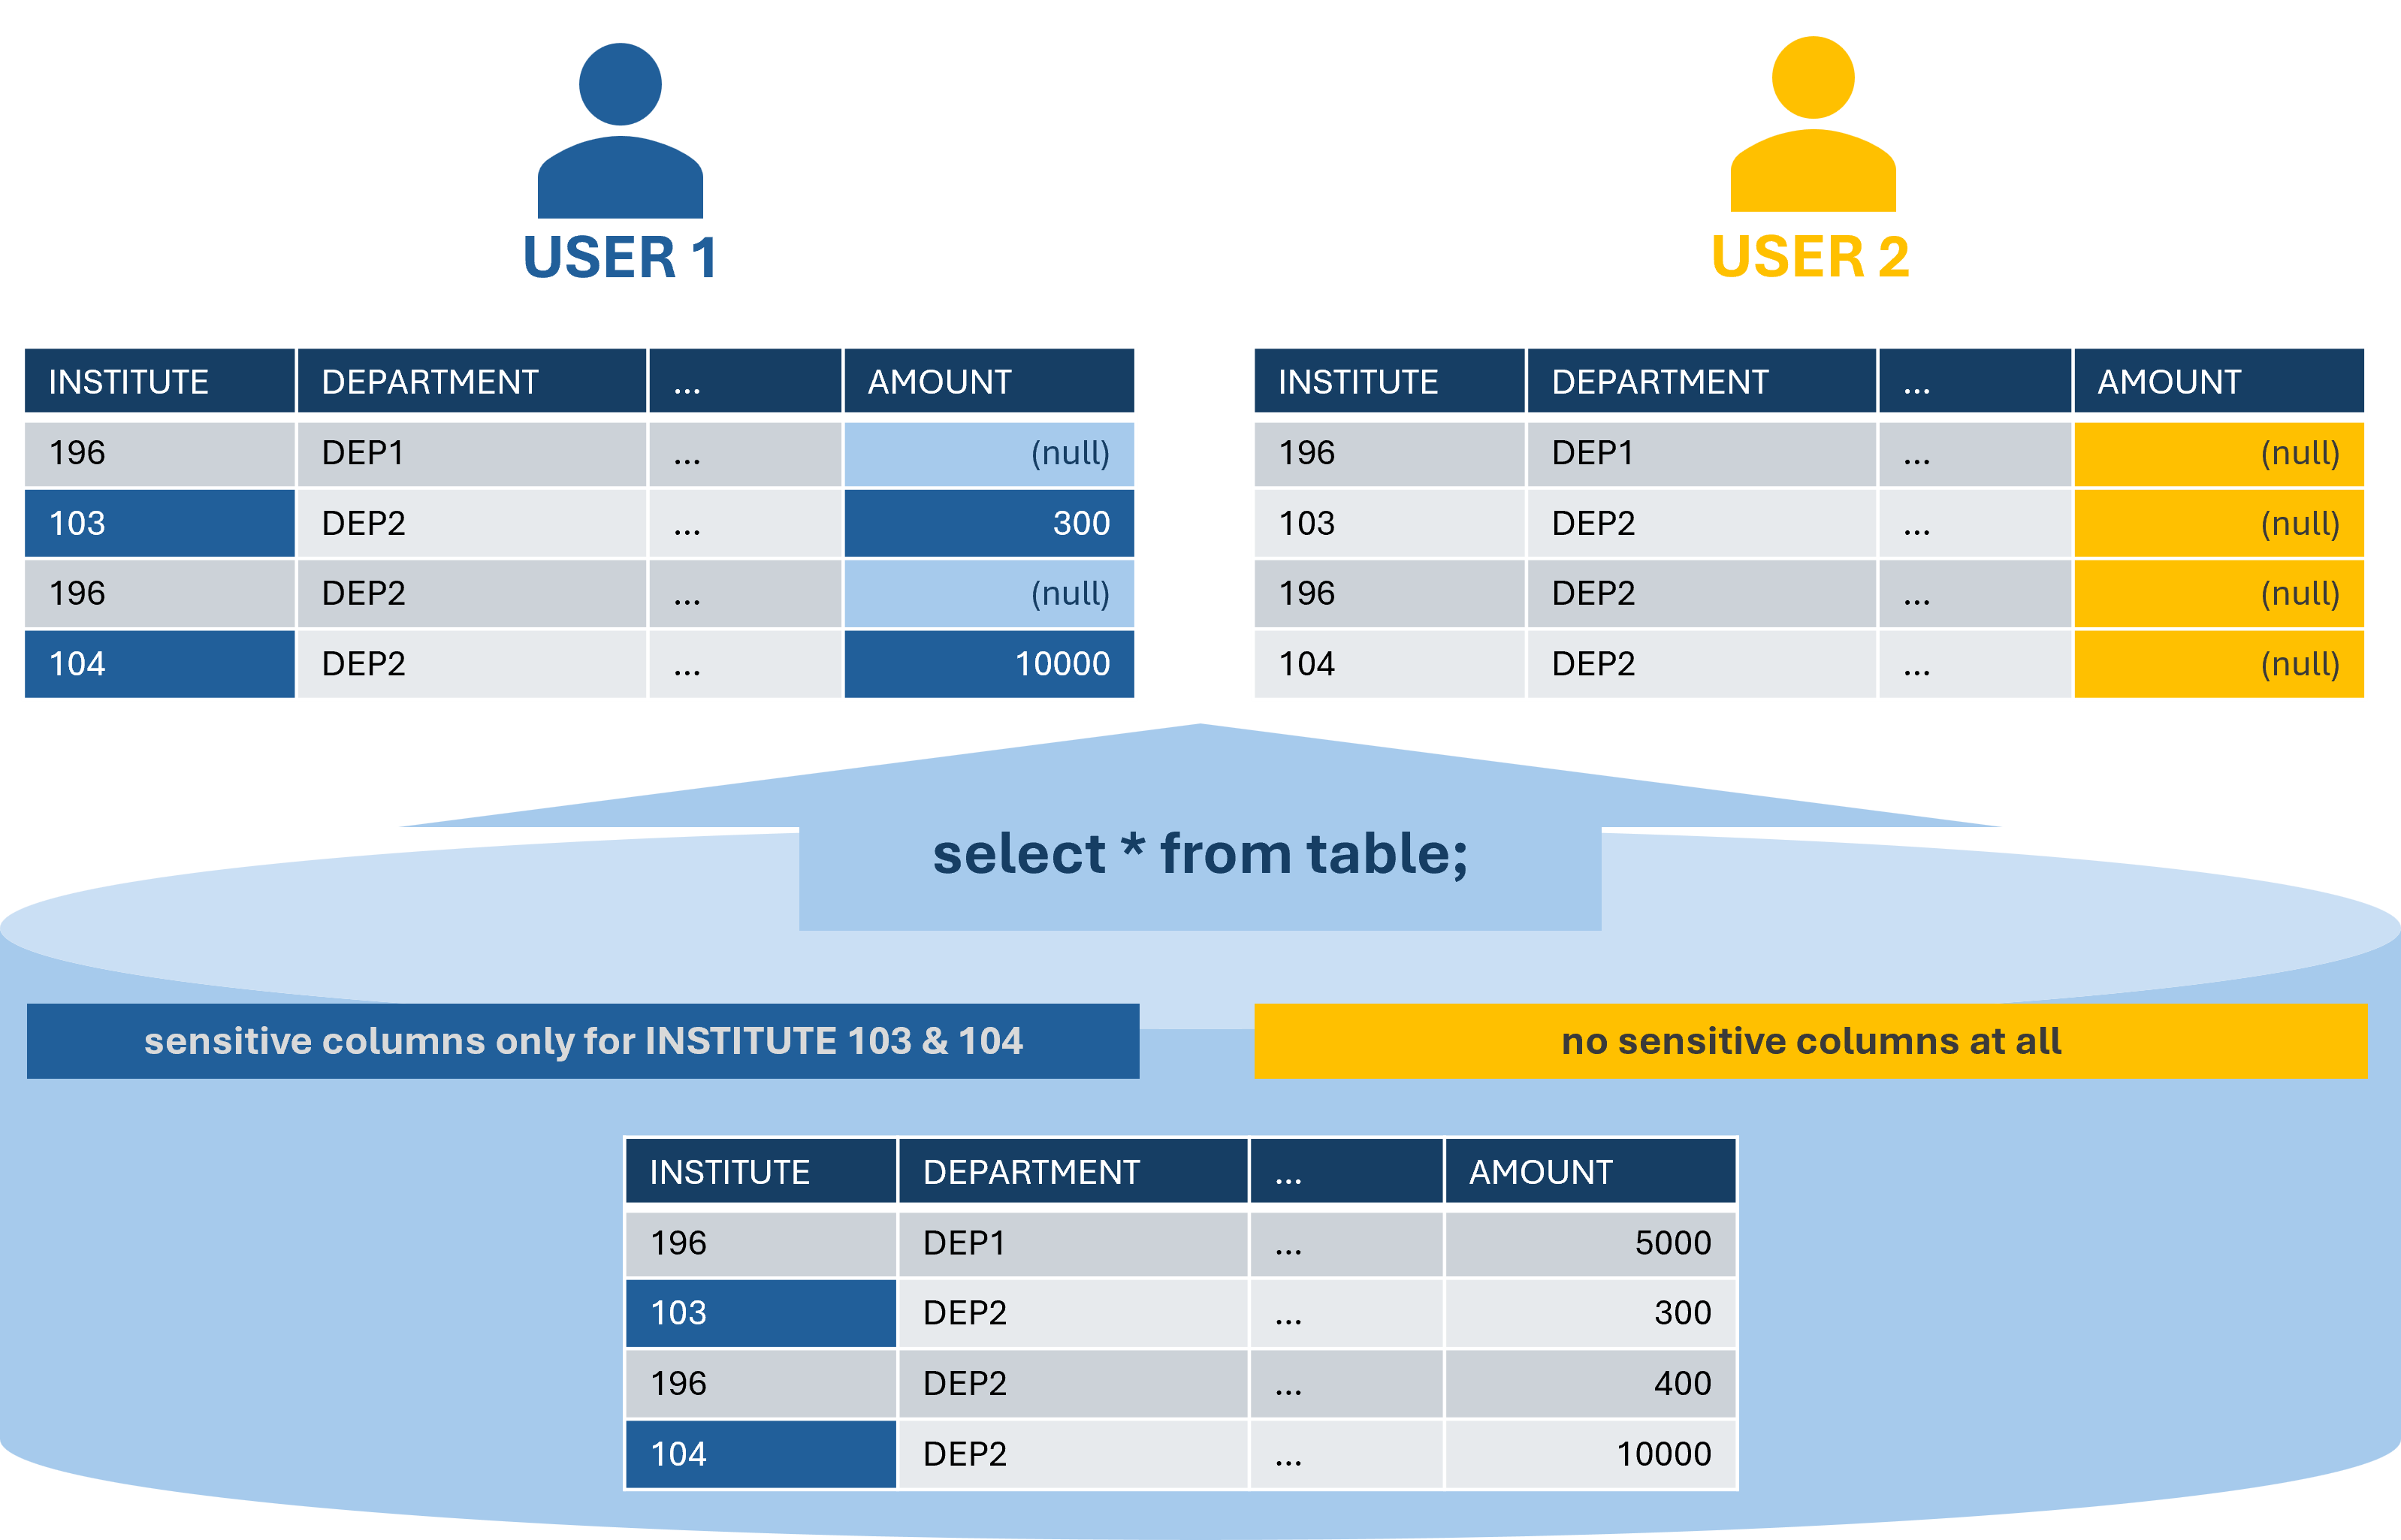
Fig. 5.4 Example for Column Level Security
5.8. Sandboxing
Sandboxes are database schemas in which objects can be created that are used, for example, for development, tests, evaluations or analyses. Sandboxes are secure playgrounds for non-productive use, e.g. not for reporting or ETL processes.
There are two types of sandboxes:
Private sandboxes
Project-related sandboxes
5.8.1. Private Sandboxes
A private sandbox is a schema that is assigned to exactly one user account and is provided with quotas. Objects created in this schema must not be used by other user accounts. The transfer of rights (grants) is prohibited and is also technically prevented. Within a private sandbox, there are no access restrictions at object or row level. The user account owns the objects in the private sandbox and therefore has full access to them. A private sandbox cannot be given an expiry date. Quotas (storage space) on private sandboxes are assigned manually or automatically. Only one private sandbox can be created per user account.
5.9. Auditing
Complete SQL auditing can be done by the Exasol database. When activating this feature, every interaction with the database is monitored and can be used to investigate possible incidents. A detailed description can be found following this link: Exasol Auditing